As i mentioned in the previous entry, one of the disadvantages of overriding the paint() method for validation overlays is that you need to do it for each one of the components that can have validation errors. So, you no longer use a “pure” JTextField, for example. You either override the paint() method when you create your text field, or use a custom class that extends JTextField and overrides the paint() method. Needless to say that the impact on your UI creation code is rather large and unpleasant. Wouldn’t it be nice if you could just inject the required functionality to all Swing components?
Although i might not be the biggest fan of aspect-oriented programming (AOP), it certainly sounds like a promising approach. In fact, AOP has been shown to address other Swing-related problems by Ben Galbraith (for adding property change support on Java beans) and by Alexander Potochkin (for tracing EDT violations). Disregarding all the hype around AOP (that seems to have thankfully died over the past year), the eventual result is that you inject the functionality you need at the specific methods in your classes. In fact, i used a very similar approach in one of my look-and-feel related projects. Isn’t this exactly what we’re looking for?
Well, it almost is. The main caveat with the bytecode injection (which is the eventual result of applying aspects to the classes) is that it is done on the bytecode class that you can control. The examples mentioned above apply this technique on the application classes. Where do we want to apply this? Mostly (unless you override the paint() method) on the core JVM classes. And this is where our problem lies.
AspectJ is one of the leading implementations of AOP in Java (especially since it has joined forces with AspectWerkz some time ago). Its load-time weaving (LTW) explicitly excludes the core classes (that would be JComponent among the rest). In addition, your application most probably doesn’t call the paint() method itself (that is left to the Swing painting pipeline, and as we have seen in the discussion on the repaint managers, there is no extension point that paints a specific dirty component). And so, if you want to use AspectJ, the only other possible option is to weave the core classes at compilation time.
You can download and build Swing using the latest JDK 7.0 weekly builds. Then, you can weave your aspect into the created swing.jar and put it in front of the bootstrap classpath. While certainly doable, this approach is far from optimal. First, you bundle an extra 4.1MB jar. Second, you’re confining yourself to the specific JDK build, including all its bugs. Third, you might run into classloader problems in specialized runtime environments, such as WebStart, applets and others.
A way around the limitation of weaving core classes would be to extend all the core Swing components, override the paint() method to call the super implementation and the weave the validation overlay logic. While it will work, it is hardly an improvement over overriding the paint() directly (without the overhead hassle of using aspects); you’ll still end up not using the core components directly in your code.
While the list of Java AOP frameworks contains other options (besides AspectJ), i am not aware of another AOP-based approach that will allow weaving core classes at runtime without any limitations. If you know of any, i will be more than happy to hear about them in the comments.
In the previous entries on painting validation overlays using repaint manager and borders i discussed why it it important to find the best painting pipeline hook that matches the specific requirements. The repaint manager is an “overshoot” since it allows painting only after all the dirty components have been painted. The borders are “undershoot” since they are painted before the child components are painted. In this entry i’m going to discuss the <a href="http://java.sun.com/j2se/1.5.0/docs/api/java/awt/Component.html#paint(java.awt.Graphics)">paint()</a> method which is one of the best hooks fit for our requirements.
While it is not recommended to override the paint() method (specifically because if you don’t call the super implementation, you “lose” the border and the children), doing it correctly is a very useful tool in any Swing developer’s arsenal. In our case, we want to paint an overlay icon on top of the component (which might have child components in it). Well, as long as the overlay icon is painted inside the component bounds, we can override the paint() method, call the super implementation (that will paint the component, its border and its children) and then paint our icon. There should be no special cases except one – extending the dirty region with a custom repaint manager (more on that later).
Let’s try implementing the validation overlays with custom paint() implementation. Note that all classes in this entry are located in the org.pushingpixels.validation.custompaint package.
The major disadvantage of overriding the paint() method is that you have to do it for every component that can display validation errors. Of course, you can come up with a factory that returns a preconfigured instance of such a component (sample implementation in the CustomPaintComponentFactory class), but it still “pollutes” your UI code with the calls to that factory. In addition, this might prove problematic with visual editors such as Matisse. Furthermore, you will have to provide a factory method for each component class (for those components that can have validation errors) and repeat the same painting code in each one of these.
The end result, however, is exactly what we’re looking for – the validation errors that are displayed on top of the components (including editable combobox that has an inner textfield implementation child):
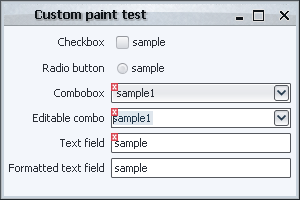
The only thing that must be mentioned (and was already mentioned in the previous entries) is the case of complex components. Here is how our UI looks like when we click the editable combobox (without a custom repaint manager installed):
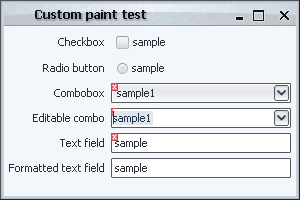
Swing is smart enough to repaint only the editor (and hence paint the validation icon in the editor bounds), but not smart enough to figure out that this editor is an integral part of a “larger” component (which means that the validation icon is not be painted outside the editor bounds, resulting in a clipped indication). Without a custom repaint manager (with its “globalness” shortcoming addressed in the relevant entry) you can end up with temporary visual artifacts (until some event that triggers the repaint of the combobox itself).
There are two possible solutions. The first is to install a custom repaint manager that extends the dirty region from the inner text field to the combobox itself. The second is to trigger the repaint of the combobox from the inner text field. The later is much more complicated, since you will have to override the paint() method of the inner text field and guard against an infinite repaint loop (repaint of combo triggering repaint of text field that trigger the repaint of combo in turn). While this can be done, it is not trivial.
As we have seen, while the custom paint() implementation is a good fit for painting the validation overlays, it a has a few disadvantages:
- Need to override
paint() for each component class that can have validation errors
- Need to install a custom repaint manager to trigger repaints of complex components
In the following entries, i will discuss a few alternatives that try to address these issues.
The new Bourne movie is out this week, and my wife is definitely going to watch it. In fact, we have a code-word for every chase-the-wrong-guy-who-eventually-wins movie that came out recently (The Contract and Shooter come to mind). Instead of reading the plot summary, i say “it’s just like Bourne” and we’re done. She just has to watch it.
So what is next for Bourne franchise? After Bourne Identity in 2002 and Bourne Supremacy in 2004 comes the new Bourne Ultimatum. It looks like it starts to follow the James Bond franchise (which is, accidentally, the highest worldwide grossing one, but that will most probably fall to Harry Potter that still has two more to go). And if you have any doubts, just look at the initials of the main characters’ names :)
So, will Matt Damon be replaced as Jason Bourne? He’s 37 years old, just four less than Sean Connery was in his last “real” Bond movie (he did come back 12 years later for one more role, though). Which brings an interesting question – how would they name the movies if Matt Damon just goes on unreplaced? Will we see some of these in 15-20 years?
- Bourne Hip Replacement
- Bourne Moving to Florida
- Bourne Hearing Aid
- Bourne Bingo
Every core Swing component inherits the <a href="http://java.sun.com/j2se/1.5.0/docs/api/javax/swing/JComponent.html#setBorder(javax.swing.border.Border)">setBorder()</a> method from the JComponent. In this entry i’m going to talk about what is possible to achieve using custom borders, and what are the limitations of this approach.
As mentioned in the overview of the Swing rendering pipeline, the component border is painted in JComponent.paint() after painting the component itself and before painting the component children. In this sequence lies the biggest strength and the biggest weakness of custom borders. The biggest strength is that it is possible to paint over the entire contents of the component once it has been painted by the paintComponent() call (which in the core implementation goes to the UI delegate), and this is in fact how the current Apple VM implementation paints Aqua buttons. The biggest weakness is that after the border is painted, Swing paints the component children in the paintChildren() call. If your custom border is required to paint outside the border insets (more on this later), most chances are that the children will be painted on top of your custom painting.
Let’s try implementing the validation overlays with custom borders. Note that all classes in this entry are located in the org.pushingpixels.validation.border and in the org.pushingpixels.validation.common package.
First note that we can no longer use the common SampleUi that creates our UI. It needs to be enhanced with setting a custom border on each one of the components that needs to display a validation icon. This border is implemented in the common.ValidationBorder class. The details are very simple – it wraps the original border, calling its methods to compute the opacity and the insets. The paintBorder() implementation calls the super implementation that paints the original border, then checks whether the component should display the validation icon, and if so, paints it. Here we have two immediate problems:
- The original border is look-and-feel specific. Even when our custom border implements the
UIResource interface (which instructs LAFs that they can install their own implementation), it still needs to be reset when the look-and-feel is changed. In our current implementation, we wrap the border only once (for the current LAF). Since we implement the UIResource interface, this border will be uninstalled on LAF change. If we don’t implement this interface, the LAF change will result in an inconsistent border. This can be addressed by:
- overriding the
updateUI() method and rewrapping the border
- installing a property change listener on
UIManager listening to the “lookAndFeel” property
- The painting of our border doesn’t respect the border insets. While the current core implementation of the Swing painting pipeline doesn’t set custom clip before the call to
setBorder(), this might change in the future.
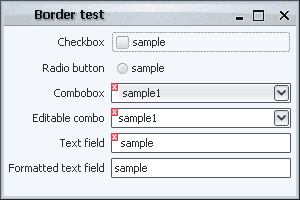
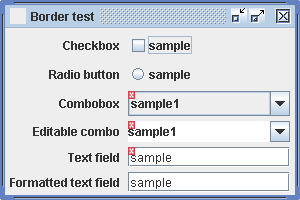
Let’s try our first implementation in the border.BorderComponentFactoryFirstTry. Here is the screenshot of our UI:

What happened with the editable combobox? As i already mentioned in the groundworks entry, an editable combobox is actually a container that has a text field and a button, and so these two are painted after the container (combobox) border is painted. This can be addressed in a number of ways.
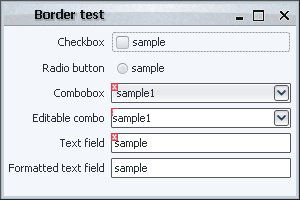
The first is to return insets that match the actual error icon. The border.InsetValidationBorder does just that – in addition to wrapping the original border, it sets adds extra six pixels to the super insets (the actual value should depend on the width of the validation error icon that you’re painting). Here is how the UI under border.BorderComponentFactorySecondTry looks like:
While the validation markers are painted correctly, the UI is far from perfect. The bottom text field doesn’t have our border installed, and so the texts are not left-aligned. In addition, even on fields that have our validation border installed, we’ll have an extra wide gap on the left when no validation overlay is shown. Furthermore, the painting of the first combobox is inconsistent – the background fill (that comes from the UI delegate) doesn’t extend behind the overlay icon.
Let’s try something else – how about installing an extra border on the editor component of the editable combobox that paints the “missing” part of the validation icon? At first, it seems quite easy, and the border.BorderComponentFactoryThirdTry does just that. It fetches the editor component from the combobox, casts it to JComponent (this might fail with ClassCastException if you have a custom editor that is not a JComponent) and installs a custom validation border. The border computes the offsets between the combobox itself and the editor component, and paints the validation icon at the relevant location. Here is how our UI now looks like:
This is a little bit unexpected – it looks like our changes didn’t have any effect. What happened here? The reason for this behavior has to do with the current look-and-feel.
The basic implementation of BasicComboBoxUI.createEditor() returns a text field that overrides the setBorder() and does nothing (see BasicComboBoxEditor.BorderlessTextField class). So, under most look-and-feels, installing a custom border on the combo editor component doesn’t have any effect! Under Metal, however, it gets even more tricky. The MetalComboBoxUI.createEditor() returns an instance of MetalComboBoxEditor which has a custom border that paints only left, top and bottom parts (no right). So, under Metal, our implementation will result in
While the icon is painted correctly (over the editor as well), the outer border is gone. This could have been addressed by wrapping the original border and painting it before painting the icon, but this would still not address the former issue (BorderlessTextField which is used under most look-and-feels).
As you can see, using only borders to paint validation overlays has problems with complex components (such as editable comboboxes and spinners). The amount of code needed to properly address these components starts to become much higher than necessary, and some problems might not be addressable at all without overriding the paint methods of the inner implementation components (which is what we’ll do in the look-and-feel sections).
In conclusion, as in the case of the repaint manager, this approach is not best suited for the specific task.
The last thing that must be mentioned (and it will hold for some of the upcoming techniques as well) is that you have to install a custom repaint manager that extends the dirty region from the editor component to the entire combobox (implemented in the common.ValidationRepaintManagerSimple). The reason is simple – suppose you start editing the value in your combobox, and the validation indication toggles (say, goes from valid to invalid state). As mentioned already, Swing is smart enough to repaint only the editor (and hence paint the validation icon in the editor bounds), but not smart enough to figure out that this editor is an integral part of a “larger” component (which means that the validation icon will not be painted outside the editor bounds, resulting in a clipped indication). Without a custom repaint manager (with its “globalness” shortcoming addressed in the relevant entry) you can end up with temporary visual artifacts (until some event that triggers the repaint of the combobox itself).
