Validation overlays using layered panes
As shown in the previous two entries, glass panes have a few disadvantages that might make you look for an alternative way of implementing your functionality. In our case, using glass pane for validation overlays might not be the best choice because of:
- You can only have one glass pane installed on a frame.
- Lightweight popup menus are displayed before the glass pane is painted.
These two can be addressed by using a lesser known technique, which only now is starting to find its way into the Swing tutorials and books – a JLayeredPane. Going back to the diagrams shown in the previous entry, a root pane consists of a sequence of “layers”. The layered pane has the content pane and the menu bar (the bounds of these two are computed by the root pane UI delegate, which will be important for the next entry). The glass pane is “located” on top of the layered pane:

The layered pane itself is a sequence of layers, as illustrated in the diagram below:
In addition to the existing six “core” layers in the default implementation of a JLayeredPane, you can install your own layers at pretty much any location (in between any two core layers). For our purpose, we would want to install our validation layer between the default and the palette layers, so that it is not painted on top of other layers (such as modal, popup or drag). Note how the JLayeredPane elegantly addresses the disadvantages of using a glass pane.
First, you can have up to 99 layers in between the “adjacent” core layers. Of course you can still have different parts of your application (such as third-party libraries) try to install their layers to the same index, but at least you will be able to control the location of your own layers (something that can not be easily addressed with glass panes or repaint managers). In addition, if your layer is placed below the popup layer, it will not show the validation overlays over the lightweight popups.
The classes in this entry are located in the org.pushingpixels.validation.layeredpane package and implement the validation overlays using a custom layered pane. The implementation of a custom validation layer in ValidationLayer is pretty much the same as the first implementation of a glass pane (without the need to specially handle the lightweight popups). It recursively visits all the components in the root pane and paints validation markers as necessary. Note that as with glass pane, we are able to paint the validation markers partially outside the component bounds.
The first attempt at installing this validation layer is in the LayeredPaneSampleUiFirstTry class, and it follows this example from the Filthy Rich Clients book. We get the layered pane of the frame root pane, add our validation layer between the core default and palette layers and install the OverlayLayout on the layered pane. Here is the result:
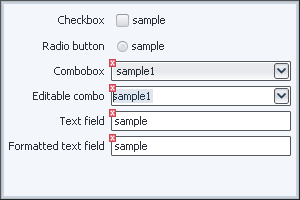
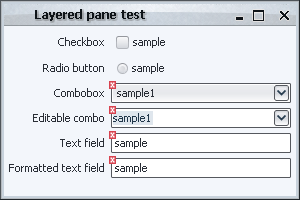
As you can see, while the validation icons are displayed correctly, the title pane is gone. This happens because the OverlayLayout overrides the layout manager that handles the placement of title pane under decorated mode. A possible solution to this problem is implemented in the LayeredPaneSampleUi which wraps the original layout manager (that handles the title pane among the rest) and positions our validation layer to span over the content pane (but not the title pane). Here is a screenshot of the same application under this implementation:
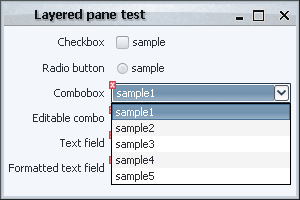
To validate that the lightweight popups are displayed correctly, here is a screenshot of the application when the first combobox shows its popup:
As you can see, implementing validation overlays using layered panes successfully addresses various issues with other techniques:
- Unlike many “component-level” techniques such as overriding paint() or using
JXLayer, it can paint outside the component bounds. - In addition, it doesn’t require installing a custom repaint manager to extend the dirty region from an internal component to the actual container (such as editable comboboxes).
- Unlike other “global” techniques such as repaint manager or glass pane, you can have multiple layers in layered pane (one for each “task”).
- In addition, you have much finer control over where your layers”goes” (unlike the glass pane).
However, this technique as implemented in our sample code still has performance issues. Since we’re painting outside the component bounds, we install a document listener on our text fields that repaints the entire frame on each document change (since any document change may result in the change of validation status). Even if the validation layer checks the clip bounds to paint the validation overlays, it doesn’t matter much since the entire frame is repainted on every document change.
This can be addressed by repainting only the relevant region “around” the text field that will contain the actual validation overlay. While this is a valid solution, it creates an unnecessary coupling between the component and the actual implementation of the validation painting. In the long run, it adds complexity and additional level of inter-module dependencies.
A much more elegant approach is implemented in the IconFeedbackPanel class of the JGoodies Validation project. Instead of having the validation layer that paints the error icons, this panel has an actual JLabel (with the error icon) for each component that needs to show a validation error. In this case, the document listener doesn’t need to trigger the repaint of the whole frame (or even compute the extended bounds for the repaint). It just causes removal or addition of a label at the relevant location in the validation layer. The core listeners (that Swing installs on each container) then simply repaint only those controls that have been affected without repainting the entire frame. In addition, this panel overrides the validateTree() that is called internally when there are changes to the layout. In this method, the locations of all validation labels are repainted. This small amount of additional coding easily addresses the issue of repaint performance.
While up until now i have talked only about the advantages of using layered panes as compared to all the other techniques that have been discussed up until now, it is not without shortcomings. These are not specific to layered panes; rather they are relevant for all “global” techniques (including repaint manager and glass pane). Think what happens to controls that are contained in such containers as JSplitPane, JScrollPane, JTabbedPane, a panel with CardLayout or a JInternalFrame. The code needs to handle the following cases:
- The viewport offsets of scroll panes – the validation markers need to be offset as necessary.
- Controls that are located in unselected tab of a tabbed pane – the validation markers shouldn’t be shown at all.
- Controls that are located in non-fronted component of a panel with card layout – the validation markers shouldn’t be shown at all.
- Controls that are located in an internal frame which has its own layered pane and glass pane.
- Controls that are only partially shown in scroll panes – the validation markers need to be clipped as necessary.
All of these simply do not exist for “control-level” techniques such as overriding paint(), using JXLayer or a custom look-and-feel (which will be shown in the next entry). The “global” techniques must address and test these cases explicitly to ensure that there are no visual artifacts on complex UIs.
