Validation overlays using glass pane
While the last two entries on AOP and JXLayer tried to address the immediate shortcomings of the paint() method (need for custom repaint manager and not using “pure” components), there is yet another limitation that was pointed out in the comments – what if you want to paint the validation overlay outside the component bounds? Here is a screenshot to illustrate this:
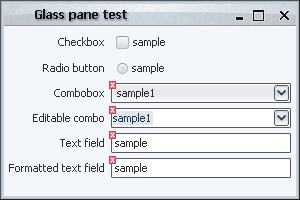
Note how the overlay icons are painted partially outside the component bounds (in this specific case, the offsets are two pixels in both dimensions), which provides a much “cleaner” view of the underlying component without sacrificing the validation icon size or opacity. So what is the limitation that we are talking about? The main reason why this is difficult to achieve with the techniques that we have seen (borders, paint() and JXLayer) is that they all are restricted to paint inside the component bounds (for more details see the JComponent.paintWithOffscreenBuffer method).
Can this be addressed? It most certainly can with techniques that operate on the “frame” level. For example, this limitation is not relevant for repaint manager since it can paint anywhere on the frame (with all the other limitations mentioned in that entry). Another frame-level technique that is available in Swing is glass pane. As i mentioned in my presentation, glass pane is a very simple and powerful technique that should be known by every Swing programmer. In one sentence, think about it as a layer that is painted over the entire frame. This means that you can paint whatever you want without being restricted by the component hierarchy or the component bounds. However, with this great power come two big disadvantages (mentioned in the introduction section of the entry on JXLayer).
The first is that when your glass pane is not opaque (as it would be in most cases since you would want to show at least some part of your application behind the glass pane), Swing has to repaint the entire frame before painting the glass pane. If you have a big frame, a lot of controls or a lot of custom painting logic, this can be very CPU-heavy process. In some cases, you might address this by taking the snapshot of your application, declaring your glass pane as opaque and just painting the application snapshot before painting the actual contents of the glass pane, but this would only work if the contents of your frame do not change as long as the glass pane is visible.
The second disadvantage of glass panes is that you can only have one glass pane installed at any given time on the specific root pane (which roughly corresponds to a window). So, if you want to use one glass pane for validation overlays (like i’ll show shortly) and another glass pane for infinite progress indication while your UI goes to the server, you’ll have to combine both painting sequences in one panel. Furthermore, you can have “rogue” third-party libraries that will install their own glass panes as the internal implementation details.
While these two issues are successfully addressed by the JXLayer implementation, it has its own shortcomings as mentioned in the relevant entry and above – you need to wrap each component with JXLayer (“tainting” you UI code) and JXLayer can only paint inside the component bounds. Note that the second limitation can be addressed in a more complicated way by wrapping the entire content pane with one big JXLayer that will paint all the validation overlays. The next entry on layered panes will show a more elegant approach to solving this problem.
The classes in this entry are located in the org.pushingpixels.validation.glasspane package implement the validation overlays using a custom glass pane. The GlassPaneSampleUi extends the basic SampleUi, adding a custom glass pane to the frame and making it visible. The glass pane itself is implemented in the ValidationGlassPane class. The constructor defines the panel as non-opaque (since we want all the components be visible “behind” the glass pane), and the paintComponent() method implements our visitor interface to paint the validation icon on relevant components with negative offsets.
There are two important points in this implementation. The first is that you need to compute the offsets between the root pane (the start of the visitor pattern implementation) and the glass pane itself (this is especially important since the implementation must run correctly under both decorated and undecorated mode). The second is the implementation itself of the visitor in the org.pushingpixels.validation.Visitor.visit method. It only paints components that intersect the current clip set by the most recent repaint event. This allows us to paint validation overlays only on the “dirty” portion of the UI. Note how in org.pushingpixels.validation.SampleUi we register a document listener on the text fields that repaints the entire frame on a document change (because in our case we want the validation overlay to be painted partially outside the text field bounds, but we don’t want to put the exact offsets in the document listener; of course this will cause the entire frame to be repainted before the glass pane is repainted, so this might be a big performance hit). Then, in the Visitor.visit we compute the intersection between the current clip and the extended component bounds. If there is intersection, we paint the validation overlay.
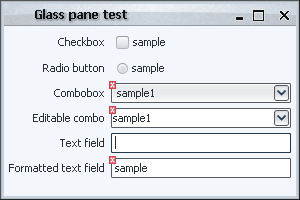
When you run the GlassPaneSample class, play with the first text field. When the contents are empty, the validation icon will not be painted:
In conclusion, you can see that a glass pane is a viable alternative to implement the validation overlays, especially when the the icons need to be painted partially outside the component bounds. While with proper coding of intersections with clipping area you can address the performance issue of the glass pane itself, the issue of repainting the entire underlying frame remains. In addition, we’re still using the global glass pane resource. The next entry on layered panes will address the later issue.
