I’ve been marinating in the world of Swing for about 17 years now, and one thing that I will say for certain is that trying to achieve native fidelity (not even the feel, but just the look of components) is a herculean task that requires constant work.
Swing engineers tried to do that at some point by delegating all the rendering to native APIs. That worked to some extent. But not the animations – since these controls were not native ones. And over the years the gap between the visuals of Swing controls under that cobbled-together house of cards and the real native controls keeps on growing larger and larger, as Microsoft keeps on tweaking and changing what native look and feel is.
The same goes for macOS – every release changes things for individual controls, as well as the overall structure of the window and the content in it. Even if somehow you managed to get aligned with the absolute latest macOS visuals (including light/dark and accent automatically respecting the user setting), if you don’t do a window layout that matches the platform guidelines, you’re still off.
And again, every year, every major platform changes things. So whoever it is that provides the UI kit that aims for native fidelity, needs to make a hard decision. Do they follow the latest native look and keep on switching to the latest native APIs (effectively abandoning the older versions of those platforms), or do they create a monstrosity of backwards compatibility, that eventually requires so much testing and hand-holding, that it collapses under its own weight?
And of course, the moment that person / organization stop maintaining that library is the moment it simply stops working on new versions of those major desktop OSes. That’s a hard guarantee.
If anything, the beautiful thing about the web expansion in the last 6-8 years is that it has shown that the end users simply do not care about native fidelity en masse. Sure, there is a small, dedicated, vocal cohort of die-hard aficionados that are willing to die on that hill, but the 99.9999% of users do not care. They want to get their thing done, and move on.
Drawing gradient fills is a basic tool that should be a part of every graphics framework, and Compose is not an exception. Gradients come in a variety of kinds – linear, radial, conical, sweep – each defining the “shape” of the color transition. In this post I’m going to focus on controlling the computation of intermediate colors along that shape, and as such, from this point on, I’ll only be talking about linear gradients. And more specifically, to keep the code samples focused on color interpolation, I’ll only be talking about horizontal linear gradients defined by two colors, start and end.
First, let’s take a look at the following screenshot:
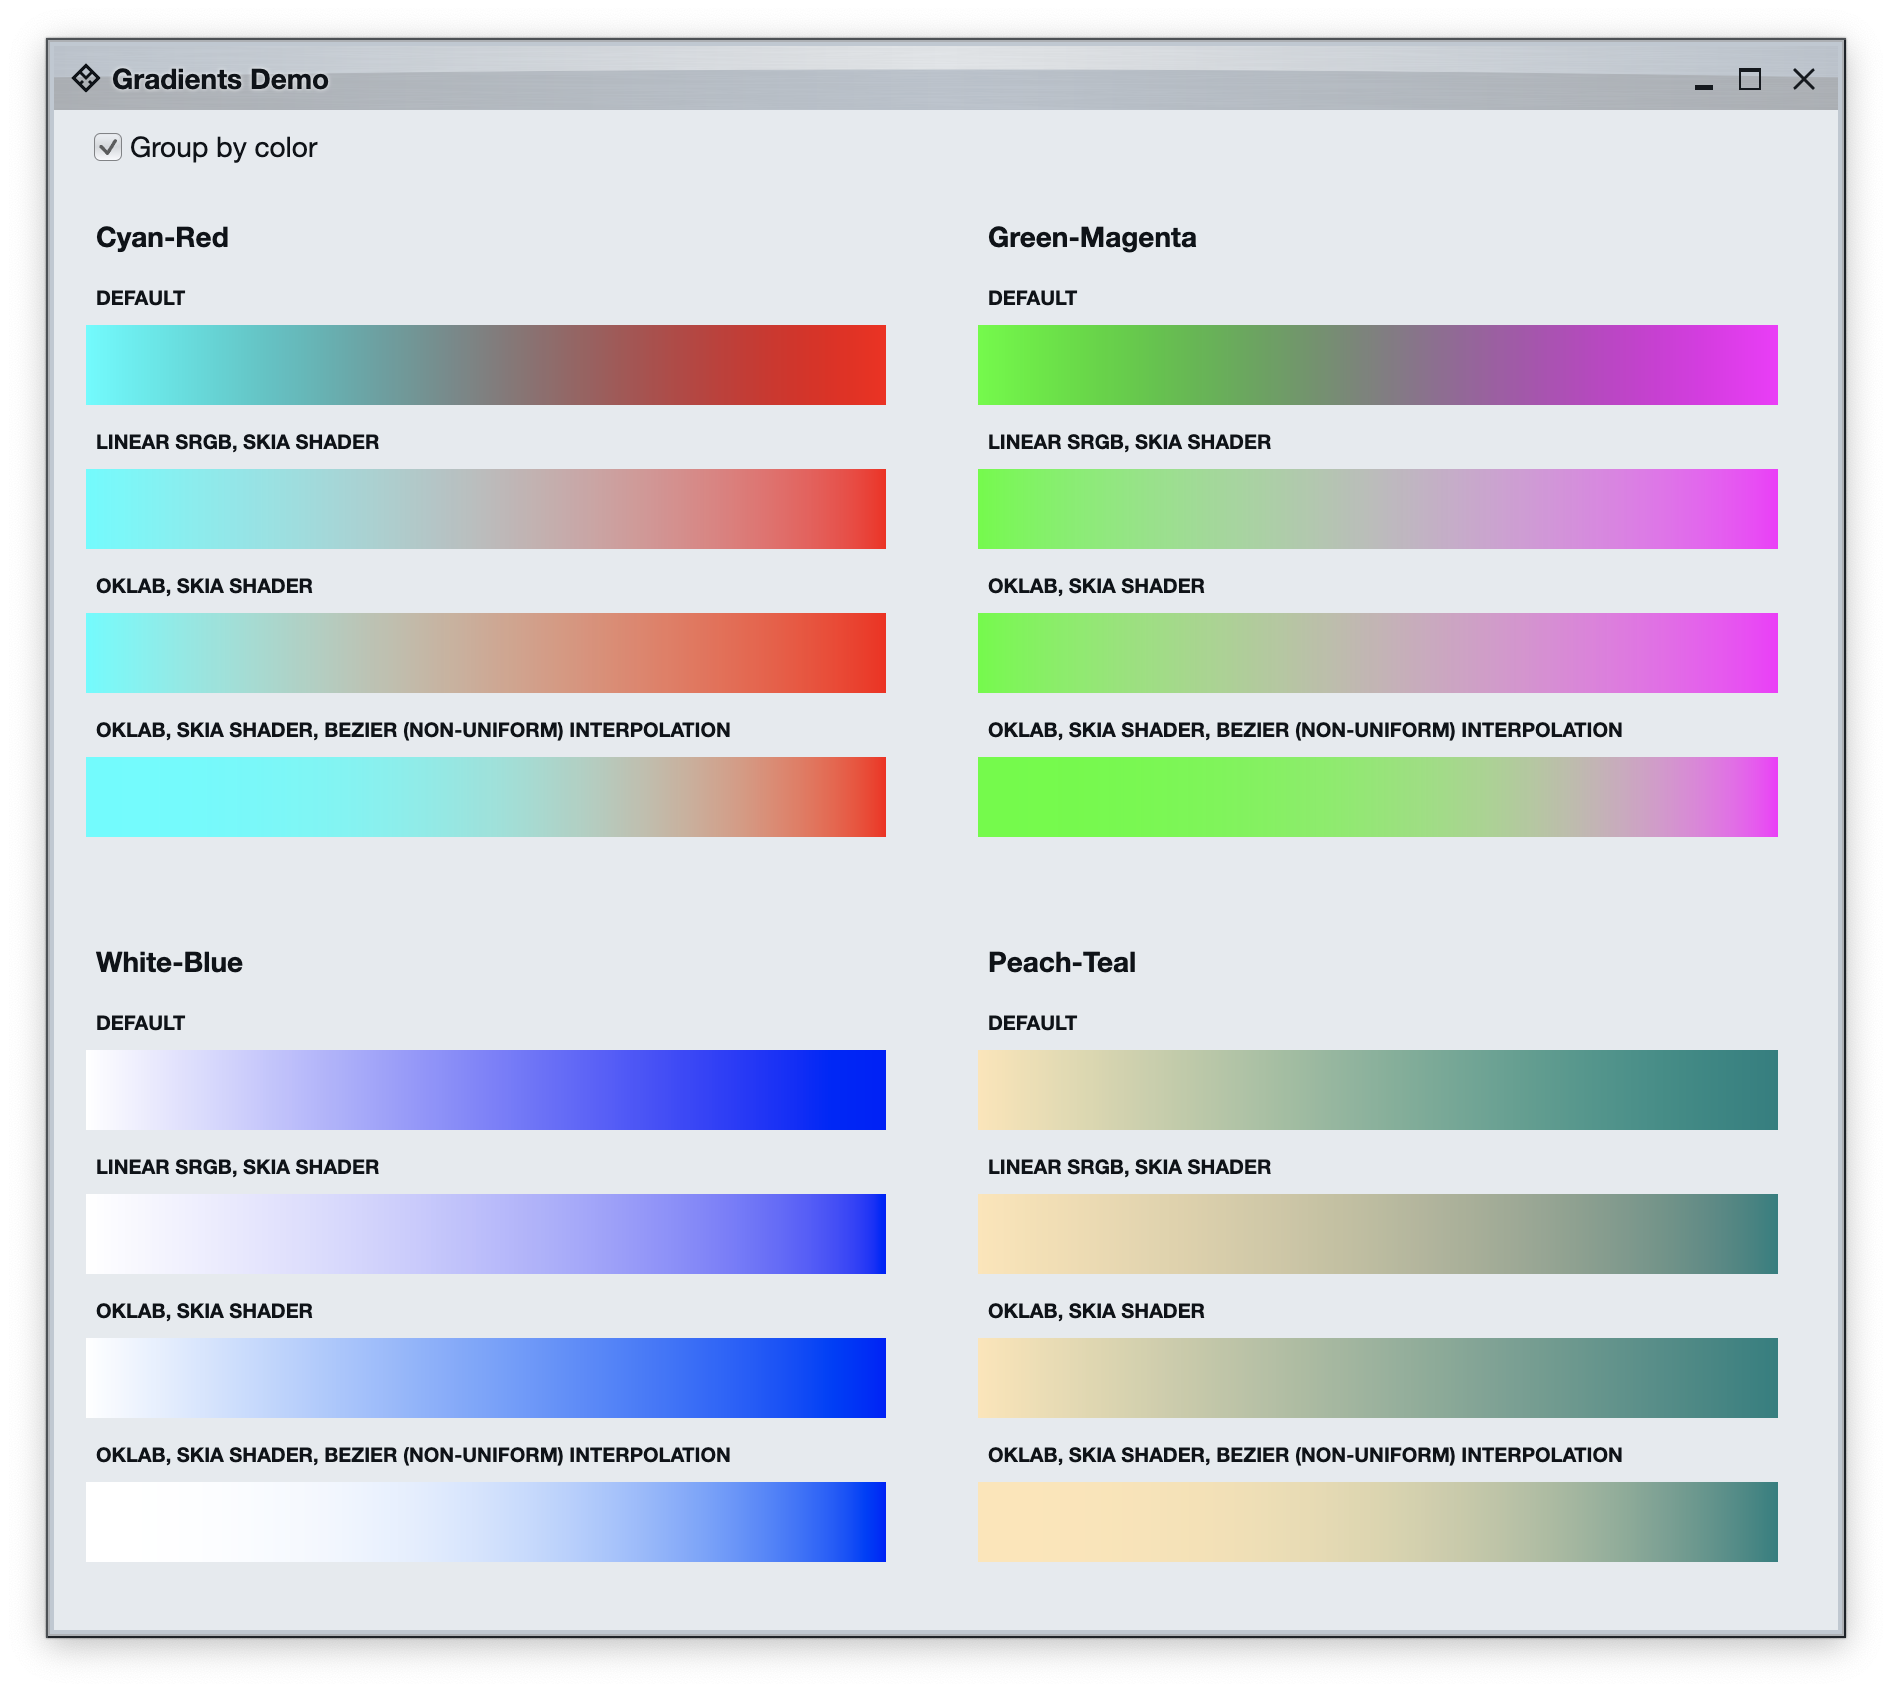
Here we have four groups of horizontal gradients. The first two are using primary colors – cyan to red and green to magenta. The third one is using white and blue. And the fourth one is using “softer” colors, in this case peach and teal. The common thing in each group is the start and end color. In each group, all the gradient rows start with the same color and end with the same color. What is different? The difference is in how we interpolate between these two colors as we “move” between these two points.
Let’s start with the default look of linear gradients provided by Compose:
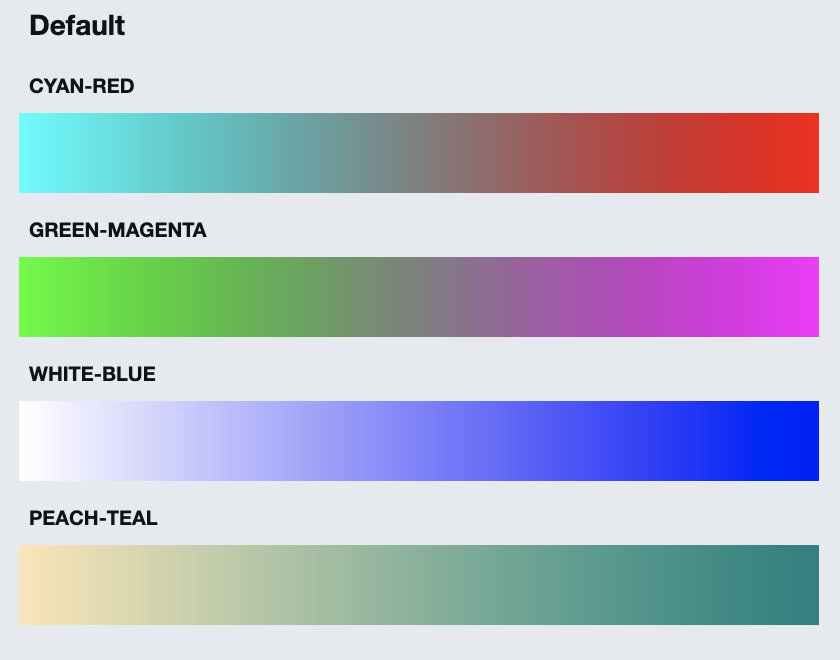
It is using the Brush.horizontalGradient Compose API:
Brush.horizontalGradient(
    0.0f to colors.start,
    1.0f to colors.end,
    startX = 0.0f,
    endX = width
)
It is the simplest to use, but also the one that might result in something that doesn’t make sense. The mid-range between cyan and red is way too muddy. The mid-range between green and magenta is muddy and also has a bit of a bluish tint to it. And most of the transition from white to blue has distinct traces of purple. Why is this happening? There’s a lot of articles online that dive deep into physics of light and human perception of color, and instead of rehashing the same content, I’m going to point you to one of them.
What does it boil down to? Color spaces. A color space is a way to map colors to numbers. The default color space, aka the one used to generate the gradients above, is called sRGB or standard RGB. And it’s not best suited for color interpolation, especially when our start and end colors are not similar – such as cyan and red that have drastically different hue, or white and blue that have drastically different brightness.
If we want our gradient transitions to be closer to physical light blending in real world, or closer to how human eye perceives color transitions, we need to explore other color spaces. At the present moment, even though Compose supports a wide variety of color spaces, it does not provide APIs to configure which color space to use for a specific Brush-created gradient.
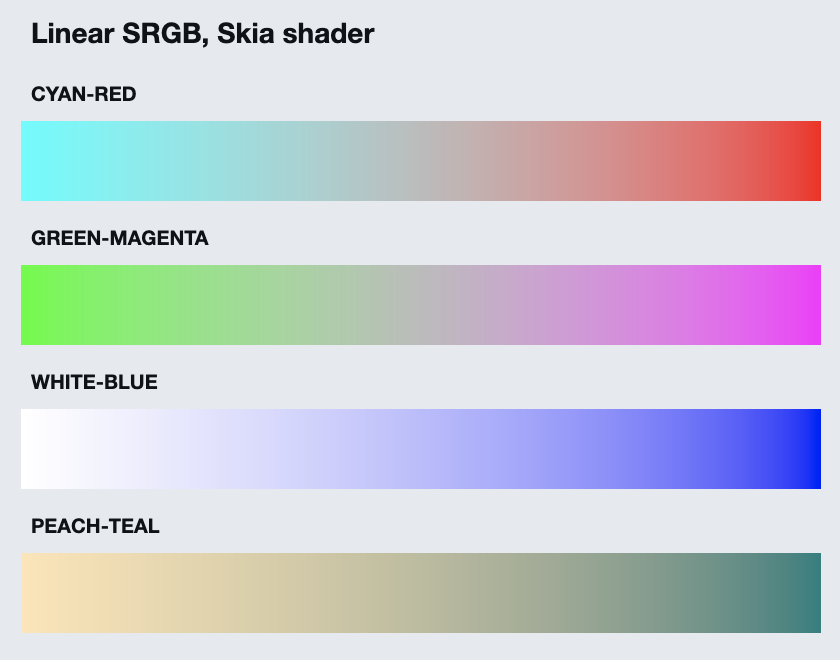
However, that should not stop us from dropping to a lower level and continuing the exploration of Skia shaders in Compose Desktop, this time for more fine-grained control of our gradients. Let’s start with Linear sRGB color space which will get us much closer to how light behaves physically:
val sksl = """
    // https://bottosson.github.io/posts/colorwrong/#what-can-we-do%3F
    vec3 linearSrgbToSrgb(vec3 x) {
        vec3 xlo = 12.92*x;
        vec3 xhi = 1.055 * pow(x, vec3(1.0/2.4)) - 0.055;
        return mix(xlo, xhi, step(vec3(0.0031308), x));

    }

    vec3 srgbToLinearSrgb(vec3 x) {
        vec3 xlo = x / 12.92;
        vec3 xhi = pow((x + 0.055)/(1.055), vec3(2.4));
        return mix(xlo, xhi, step(vec3(0.04045), x));
    }

    uniform vec4 start;
    uniform vec4 end;
    uniform float width;

    half4 main(vec2 fragcoord) {
       // Implicit assumption in here that colors are full opacity
       float fraction = fragcoord.x / width;
       // Convert start and end colors to linear SRGB
       vec3 linearStart = srgbToLinearSrgb(start.xyz);
       vec3 linearEnd = srgbToLinearSrgb(end.xyz);
       // Interpolate in linear SRGB space
       vec3 linearInterpolated = mix(linearStart, linearEnd, fraction);
       // And convert back to SRGB
       return vec4(linearSrgbToSrgb(linearInterpolated), 1.0);
    }
"""

val dataBuffer = ByteBuffer.allocate(36).order(ByteOrder.LITTLE_ENDIAN)
// RGBA colorLight
dataBuffer.putFloat(0, colors.start.red)
dataBuffer.putFloat(4, colors.start.green)
dataBuffer.putFloat(8, colors.start.blue)
dataBuffer.putFloat(12, colors.start.alpha)
// RGBA colorDark
dataBuffer.putFloat(16, colors.end.red)
dataBuffer.putFloat(20, colors.end.green)
dataBuffer.putFloat(24, colors.end.blue)
dataBuffer.putFloat(28, colors.end.alpha)
// Width
dataBuffer.putFloat(32, width)

val effect = RuntimeEffect.makeForShader(sksl)
val shader = effect.makeShader(
    uniforms = Data.makeFromBytes(dataBuffer.array()),
    children = null,
    localMatrix = null,
    isOpaque = false
)

ShaderBrush(shader)
What are we doing here? It’s a three-step process:
- Convert the start and end colors to the Linear sRGB color space. Remember that a color space is a way to map colors to numbers. What we’re doing here is mapping our colors to a different set of numbers.
- Do linear interpolation between the converted colors based on the X coordinate.
- Convert the interpolated color back to the sRGB color space.
Let’s see the end result again

Here we see most of the muddiness gone between cyan and red, and green and magenta – even though we are losing some of the vibrancy in that transition, especially in green-magenta. And we still have a distinct purple hue in the white-blue gradient.
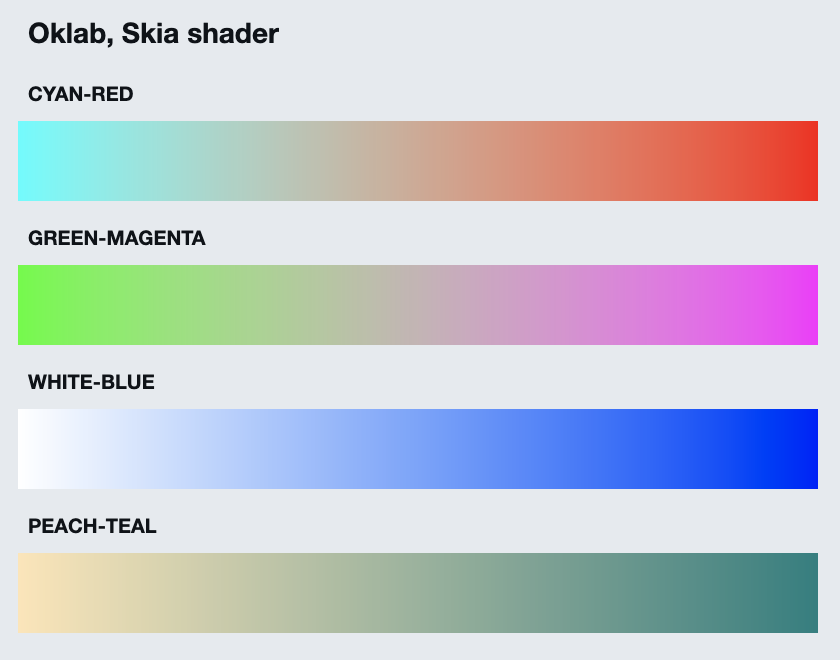
And now it’s time to look at Oklab, a recent project that aims to provide a perceptually uniform color space. Here are our gradients under Oklab:
val sksl = """
    // https://bottosson.github.io/posts/colorwrong/#what-can-we-do%3F
    vec3 linearSrgbToSrgb(vec3 x) {
        vec3 xlo = 12.92*x;
        vec3 xhi = 1.055 * pow(x, vec3(1.0/2.4)) - 0.055;
        return mix(xlo, xhi, step(vec3(0.0031308), x));

    }

    vec3 srgbToLinearSrgb(vec3 x) {
        vec3 xlo = x / 12.92;
        vec3 xhi = pow((x + 0.055)/(1.055), vec3(2.4));
        return mix(xlo, xhi, step(vec3(0.04045), x));
    }

    // https://bottosson.github.io/posts/oklab/#converting-from-linear-srgb-to-oklab
    const mat3 fromOkStep1 = mat3(
       1.0, 1.0, 1.0,
       0.3963377774, -0.1055613458, -0.0894841775,
       0.2158037573, -0.0638541728, -1.2914855480);

    const mat3 fromOkStep2 = mat3(
       4.0767416621, -1.2684380046, -0.0041960863,
       -3.3077115913, 2.6097574011, -0.7034186147,
       0.2309699292, -0.3413193965,  1.7076147010);

    const mat3 toOkStep1 = mat3(
       0.4122214708, 0.2119034982, 0.0883024619,
       0.5363325363, 0.6806995451, 0.2817188376,
       0.0514459929, 0.1073969566, 0.6299787005);

    const mat3 toOkStep2 = mat3(
       0.2104542553, 1.9779984951, 0.0259040371,
       0.7936177850, -2.4285922050, 0.7827717662,
       -0.0040720468, 0.4505937099, -0.8086757660);

    vec3 linearSrgbToOklab(vec3 x) {
        vec3 lms = toOkStep1 * x;
        return toOkStep2 * (sign(lms)*pow(abs(lms), vec3(1.0/3.0)));
    }

    vec3 oklabToLinearSrgb(vec3 x) {
        vec3 lms = fromOkStep1 * x;
        return fromOkStep2 * (lms * lms * lms);
    }

    uniform vec4 start;
    uniform vec4 end;
    uniform float width;

    half4 main(vec2 fragcoord) {
       // Implicit assumption in here that colors are full opacity
       float fraction = fragcoord.x / width;
       // Convert start and end colors to Oklab
       vec3 oklabStart = linearSrgbToOklab(srgbToLinearSrgb(start.xyz));
       vec3 oklabEnd = linearSrgbToOklab(srgbToLinearSrgb(end.xyz));
       // Interpolate in Oklab space
       vec3 oklabInterpolated = mix(oklabStart, oklabEnd, fraction);
       // And convert back to SRGB
       return vec4(linearSrgbToSrgb(oklabToLinearSrgb(oklabInterpolated)), 1.0);
    }
"""

val dataBuffer = ByteBuffer.allocate(36).order(ByteOrder.LITTLE_ENDIAN)
// RGBA colorLight
dataBuffer.putFloat(0, colors.start.red)
dataBuffer.putFloat(4, colors.start.green)
dataBuffer.putFloat(8, colors.start.blue)
dataBuffer.putFloat(12, colors.start.alpha)
// RGBA colorDark
dataBuffer.putFloat(16, colors.end.red)
dataBuffer.putFloat(20, colors.end.green)
dataBuffer.putFloat(24, colors.end.blue)
dataBuffer.putFloat(28, colors.end.alpha)
// Width
dataBuffer.putFloat(32, width)

val effect = RuntimeEffect.makeForShader(sksl)
val shader = effect.makeShader(
    uniforms = Data.makeFromBytes(dataBuffer.array()),
    children = null,
    localMatrix = null,
    isOpaque = false
)

ShaderBrush(shader)
It’s the same three-step process that we had with the Linear sRGB:
- Convert the start and end colors to the Oklab color space. Note that if you’re operating in N color spaces and need to convert colors between any two arbitrary color spaces, it is easier to designate one of them as intermediary. In our case, we transform from sRGB to Linear sRGB, and then from Linear sRGB to Oklab.
- Do linear interpolation between the converted colors based on the X coordinate.
- Convert the interpolated color back to the sRGB color space (via Linear sRGB).
Let’s see the end result again

Most of the muddiness gone between cyan and red, and green and magenta is still gone, but now we also have a bit more vibrancy in that transition, especially in cyan-red. And our white-blue gradient does not have any presence of that purple hue that we saw in sRGB and Linear sRGB gradients.
Now, since we are in control of how each pixel gets its color, we can go a bit deeper. Up until now, the interpolation step itself is doing a simple linear computation. A point halfway between the start and the end gets 50% of each component (which might be red/green/blue in sRGB, or something a bit more “abstract” in other color spaces). What if we wanted to a non-uniform interpolation on our target color space, something that, let’s say, favors the start point so that its color spreads deeper into the final gradient?
Staying in the Oklab color space, let’s switch from uniform interpolation between start and end colors to use a custom Bezier curve:
val sksl = """
    // https://bottosson.github.io/posts/colorwrong/#what-can-we-do%3F
    vec3 linearSrgbToSrgb(vec3 x) {
        vec3 xlo = 12.92*x;
        vec3 xhi = 1.055 * pow(x, vec3(1.0/2.4)) - 0.055;
        return mix(xlo, xhi, step(vec3(0.0031308), x));

    }

    vec3 srgbToLinearSrgb(vec3 x) {
        vec3 xlo = x / 12.92;
        vec3 xhi = pow((x + 0.055)/(1.055), vec3(2.4));
        return mix(xlo, xhi, step(vec3(0.04045), x));
    }

    // https://bottosson.github.io/posts/oklab/#converting-from-linear-srgb-to-oklab
    const mat3 fromOkStep1 = mat3(
       1.0, 1.0, 1.0,
       0.3963377774, -0.1055613458, -0.0894841775,
       0.2158037573, -0.0638541728, -1.2914855480);

    const mat3 fromOkStep2 = mat3(
       4.0767416621, -1.2684380046, -0.0041960863,
       -3.3077115913, 2.6097574011, -0.7034186147,
       0.2309699292, -0.3413193965,  1.7076147010);

    const mat3 toOkStep1 = mat3(
       0.4122214708, 0.2119034982, 0.0883024619,
       0.5363325363, 0.6806995451, 0.2817188376,
       0.0514459929, 0.1073969566, 0.6299787005);

    const mat3 toOkStep2 = mat3(
       0.2104542553, 1.9779984951, 0.0259040371,
       0.7936177850, -2.4285922050, 0.7827717662,
       -0.0040720468, 0.4505937099, -0.8086757660);

    vec3 linearSrgbToOklab(vec3 x) {
        vec3 lms = toOkStep1 * x;
        return toOkStep2 * (sign(lms)*pow(abs(lms), vec3(1.0/3.0)));
    }

    vec3 oklabToLinearSrgb(vec3 x) {
        vec3 lms = fromOkStep1 * x;
        return fromOkStep2 * (lms * lms * lms);
    }

    // https://en.wikipedia.org/wiki/B%C3%A9zier_curve
    vec2 spline(vec2 start, vec2 control1, vec2 control2, vec2 end, float t) {
        float invT = 1.0 - t;
        return start * invT * invT * invT + control1 * 3.0 * t * invT * invT + control2 * 3.0 * t * t * invT + end * t * t * t;
    }

    uniform vec4 start;
    uniform vec4 end;
    uniform float width;

    // Bezier curve points. Note the the first control point is intentionally
    // outside the 0.0-1.0 x range to further "favor" the curve towards the start
    vec2 bstart = vec2(0.0, 0.0);
    vec2 bcontrol1 = vec2(1.3, 0.0);
    vec2 bcontrol2 = vec2(0.9, 0.1);
    vec2 bend = vec2(1.0, 1.0);

    half4 main(vec2 fragcoord) {
       // Implicit assumption in here that colors are full opacity
       float fraction = spline(bstart, bcontrol1, bcontrol2, bend, fragcoord.x / width).y;
       // Convert start and end colors to Oklab
       vec3 oklabStart = linearSrgbToOklab(srgbToLinearSrgb(start.xyz));
       vec3 oklabEnd = linearSrgbToOklab(srgbToLinearSrgb(end.xyz));
       // Interpolate in Oklab space
       vec3 oklabInterpolated = mix(oklabStart, oklabEnd, fraction);
       // And convert back to SRGB
       return vec4(linearSrgbToSrgb(oklabToLinearSrgb(oklabInterpolated)), 1.0);
    }
"""

val dataBuffer = ByteBuffer.allocate(36).order(ByteOrder.LITTLE_ENDIAN)
// RGBA colorLight
dataBuffer.putFloat(0, colors.start.red)
dataBuffer.putFloat(4, colors.start.green)
dataBuffer.putFloat(8, colors.start.blue)
dataBuffer.putFloat(12, colors.start.alpha)
// RGBA colorDark
dataBuffer.putFloat(16, colors.end.red)
dataBuffer.putFloat(20, colors.end.green)
dataBuffer.putFloat(24, colors.end.blue)
dataBuffer.putFloat(28, colors.end.alpha)
// Width
dataBuffer.putFloat(32, width)

val effect = RuntimeEffect.makeForShader(sksl)
val shader = effect.makeShader(
    uniforms = Data.makeFromBytes(dataBuffer.array()),
    children = null,
    localMatrix = null,
    isOpaque = false
)

ShaderBrush(shader)
The only difference here is in these lines:
    // Bezier curve points. Note the the first control point is intentionally
    // outside the 0.0-1.0 x range to further "favor" the curve towards the start
    vec2 bstart = vec2(0.0, 0.0);
    vec2 bcontrol1 = vec2(1.3, 0.0);
    vec2 bcontrol2 = vec2(0.9, 0.1);
    vec2 bend = vec2(1.0, 1.0);

    half4 main(vec2 fragcoord) {
       float fraction = spline(bstart, bcontrol1, bcontrol2, bend, fragcoord.x / width).y;
       ...
    }
We’re still using the X coordinate, but now we feed that into a Bezier cubic curve that heavily favors the start point (see the curve graph here). The end result is a set of gradients that have more “presence” of the start color:
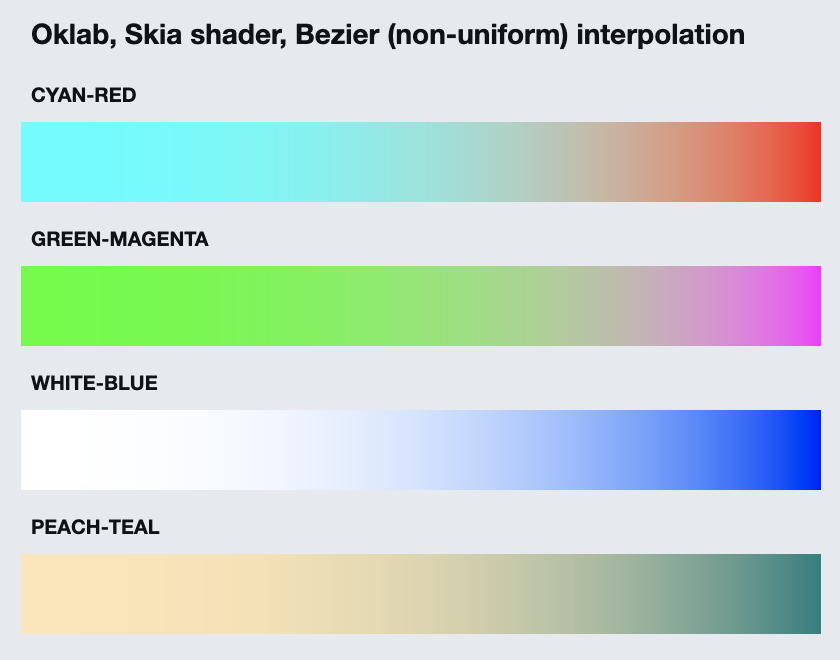
To sum it all up, here are all the gradients grouped by color space and interpolation function:

A couple of notes:
- The default sRGB and the Linear sRGB color spaces are particularly bad for gradients that have a large variance in hue and / or brightness. If your gradients use perceptually close colors, such as slight variations of the same palette color, you might not need the overhead of dropping down to Skia shaders.
- Sometimes the difference between Linear sRGB and Oklab is going to be subjective, such as the peach-teal gradient above.
- The implementation above only works for horizontal, two-stop gradients. A more generic, multi-stop linear gradient that supports arbitrary direction of the gradient would need a more generic implementation.
- For radial, sweep and conical gradients, the core logic of converting colors between color spaces stays the same. The only difference is going to be how [X,Y] coordinates of a pixel are used to compute the blend factor.
And here, it’s time to say goodbye to 2021. Stay tuned for more explorations of Skia shaders in Compose Desktop in 2022!
In the past year or so I’ve been working on a new project. Aurora is a set of libraries for building Compose Desktop apps, taking most of the building blocks from Radiance. I don’t have a firm date yet for when the first release of Aurora will be available, but in the meanwhile I want to talk about something I’ve been playing with over the last few weeks.
Skia is a library that serves as the graphics engine for Chrome, Android, Flutter, Firefox and many other popular platforms. It has also been chosen by Jetbrains as the graphics engine for Compose Desktop. One of the more interesting parts of Skia is SkSL – Skia’s shading language – that allows writing fast and powerful fragment shaders. While shaders are usually associated with rendering complex scenes in video games and CGI effects, in this post I’m going to show how I’m using Skia shaders to render textured backgrounds for desktop apps.
First, let’s start with a few screenshots:
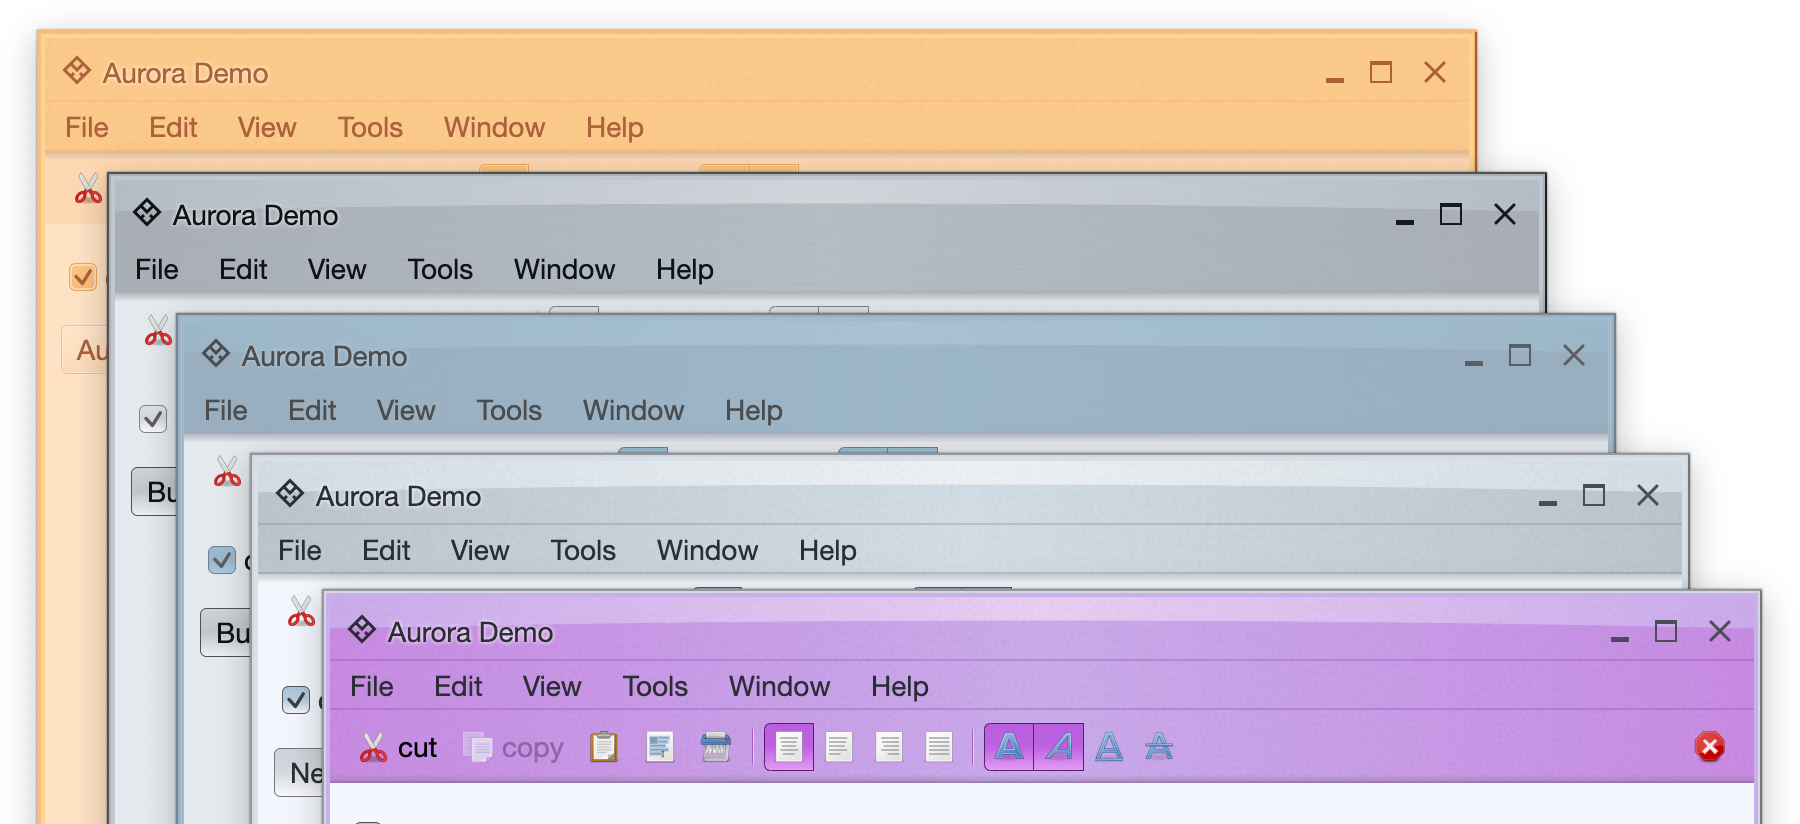
Here we see the top part of a sample demo frame under five different Aurora skins (from top to bottom, Autumn, Business, Business Blue Steel, Nebula, Nebula Amethyst). Autumn features a flat color fill, while other four have a horizontal gradient (darker at the edges, lighter in the middle) overlaid with an curved arc along the top edge. If you look closer, all five also feature something else – a muted texture that spans the whole colored area.
Let’s take a look at another screenshot:
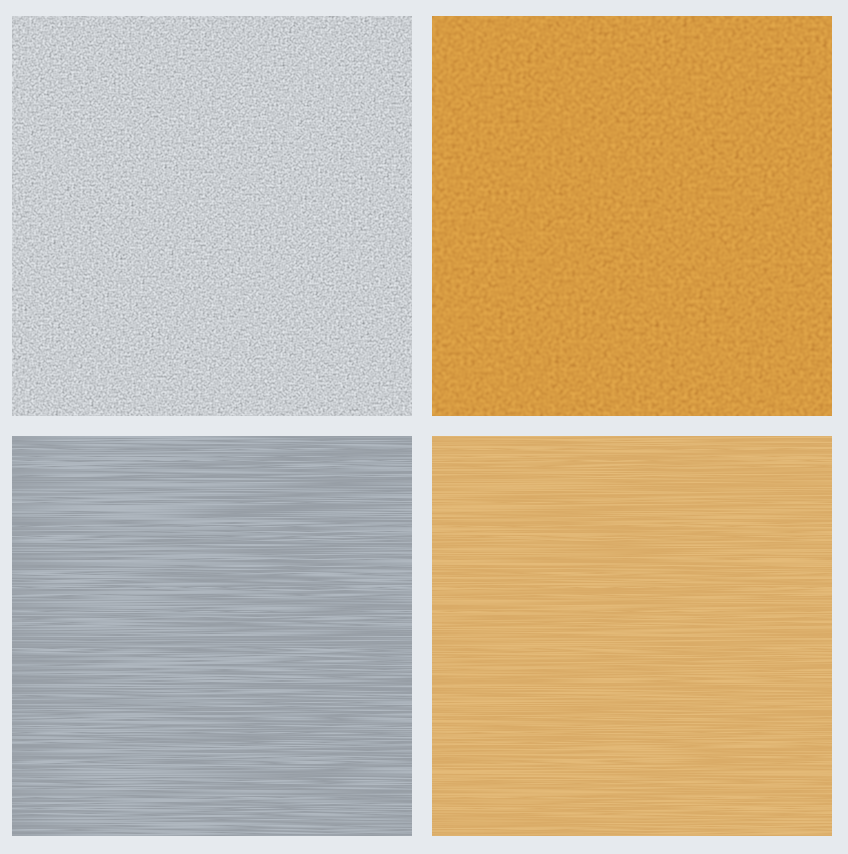
Top row shows a Perlin noise texture, one in greyscale and one in orange. Bottom row shows a brushed metal texture, one in greyscale and one in orange.
Let’s take a look at how to create these textures with Skia shaders in Compose Desktop.
First, we start with Shader.makeFractalNoise that wraps SkPerlinNoiseShader::MakeFractalNoise:
// Fractal noise shader
val noiseShader = Shader.makeFractalNoise(
    baseFrequencyX = baseFrequency,
    baseFrequencyY = baseFrequency,
    numOctaves = 1,
    seed = 0.0f,
    tiles = emptyArray()
)
Next, we have a custom duotone SkSL shader that computes luma (brightness) of each pixel, and uses that luma to map the original color to a point between two given colors (light and dark):
// Duotone shader
val duotoneDesc = """
  uniform shader shaderInput;
  uniform vec4 colorLight;
  uniform vec4 colorDark;
  uniform float alpha;

  half4 main(vec2 fragcoord) {
    vec4 inputColor = shaderInput.eval(fragcoord);
    float luma = dot(inputColor.rgb, vec3(0.299, 0.587, 0.114));
    vec4 duotone = mix(colorLight, colorDark, luma);
    return vec4(duotone.r * alpha, duotone.g * alpha, duotone.b * alpha, alpha);
  }
"""
This shader gets four inputs. The first is another shader (which will be the fractal noise that we’ve created earlier). The next two are two colors, and the last one is alpha (for applying partial translucency).
Now we create a byte buffer to pass our colors and alpha to this shader:
val duotoneDataBuffer = ByteBuffer.allocate(36).order(ByteOrder.LITTLE_ENDIAN)
// RGBA colorLight
duotoneDataBuffer.putFloat(0, colorLight.red)
duotoneDataBuffer.putFloat(4, colorLight.green)
duotoneDataBuffer.putFloat(8, colorLight.blue)
duotoneDataBuffer.putFloat(12, colorLight.alpha)
// RGBA colorDark
duotoneDataBuffer.putFloat(16, colorDark.red)
duotoneDataBuffer.putFloat(20, colorDark.green)
duotoneDataBuffer.putFloat(24, colorDark.blue)
duotoneDataBuffer.putFloat(28, colorDark.alpha)
// Alpha
duotoneDataBuffer.putFloat(32, alpha)
And create our duotone shader with RuntimeEffect.makeForShader (a wrapper for SkRuntimeEffect::MakeForShader) and RuntimeEffect.makeShader (a wrapper for SkRuntimeEffect::makeShader):
val duotoneEffect = RuntimeEffect.makeForShader(duotoneDesc)
val duotoneShader = duotoneEffect.makeShader(
    uniforms = Data.makeFromBytes(duotoneDataBuffer.array()),
    children = arrayOf(noiseShader),
    localMatrix = null,
    isOpaque = false
)
With this shader, we have two options to fill the background of a Compose element. The first one is to wrap Skia’s shader in Compose’s ShaderBrush and use drawBehind modifier:
val brush = ShaderBrush(duotoneShader)
Box(modifier = Modifier.fillMaxSize().drawBehind {
    drawRect(
      brush = brush, topLeft = Offset(100f, 65f), size = Size(400f, 400f)
    )
})
The second option is to create a local Painter object, use DrawScope.drawIntoCanvas block in the overriden DrawScope.onDraw, get the native canvas with Canvas.nativeCanvas and call drawPaint on the native (Skia) canvas directly with the Skia shader we created:
val shaderPaint = Paint()
shaderPaint.setShader(duotoneShader)

Box(modifier = Modifier.fillMaxSize().paint(painter = object : Painter() {
  override val intrinsicSize: Size
    get() = Size.Unspecified

  override fun DrawScope.onDraw() {
    this.drawIntoCanvas {
      val nativeCanvas = it.nativeCanvas
      nativeCanvas.translate(100f, 65f)
      nativeCanvas.clipRect(Rect.makeWH(400f, 400f))
      nativeCanvas.drawPaint(shaderPaint)
    }
  }
}))
What about the brushed metal texture? In Aurora it is generated by applying modulated sine / cosine waves on top of the Perlin noise shader. The relevant snippet is:
// Brushed metal shader
val brushedMetalDesc = """
        uniform shader shaderInput;

        half4 main(vec2 fragcoord) {
          vec4 inputColor = shaderInput.eval(vec2(0, fragcoord.y));
          // Compute the luma at the first pixel in this row
          float luma = dot(inputColor.rgb, vec3(0.299, 0.587, 0.114));
          // Apply modulation to stretch and shift the texture for the brushed metal look
          float modulated = abs(cos((0.004 + 0.02 * luma) * (fragcoord.x + 200) + 0.26 * luma)
              * sin((0.06 - 0.25 * luma) * (fragcoord.x + 85) + 0.75 * luma));
          // Map 0.0-1.0 range to inverse 0.15-0.3
          float modulated2 = 0.3 - modulated / 6.5;
          half4 result = half4(modulated2, modulated2, modulated2, 1.0);
          return result;
        }
"""
val brushedMetalEffect = RuntimeEffect.makeForShader(brushedMetalDesc)
val brushedMetalShader = brushedMetalEffect.makeShader(
    uniforms = null,
    children = arrayOf(noiseShader),
    localMatrix = null,
    isOpaque = false
)
And then passing the blur shader as the input to the duotone shader:
val duotoneEffect = RuntimeEffect.makeForShader(duotoneDesc)
val duotoneShader = duotoneEffect.makeShader(
  uniforms = Data.makeFromBytes(duotoneDataBuffer.array()),
  children = arrayOf(brushedMetalShader),
  localMatrix = null,
  isOpaque = false
)
The full pipeline for generating these two Aurora textured shaders is here, and the rendering of textures is done here.
What if we want our shaders to be dynamic? First let’s see a couple of videos:
The full code for these two demos can be found here and here.
The core setup is the same – use Runtime.makeForShader to compile the SkSL shader snippet, pass parameters with RuntimeEffect.makeShader, and then use either ShaderBrush + drawBehind or Painter + DrawScope.drawIntoCanvas + Canvas.nativeCanvas + Canvas.drawPaint. The additional setup involved is around dynamically changing one or more shader attributes based on time (and maybe other parameters) and using built-in Compose reactive flow to update the pixels in real time.
First, we set up our variables:
val runtimeEffect = RuntimeEffect.makeForShader(sksl)
val shaderPaint = remember { Paint() }
val byteBuffer = remember { ByteBuffer.allocate(4).order(ByteOrder.LITTLE_ENDIAN) }
var timeUniform by remember { mutableStateOf(0.0f) }
var previousNanos by remember { mutableStateOf(0L) }
Then we update our shader with the time-based parameter:
val timeBits = byteBuffer.clear().putFloat(timeUniform).array()
val shader = runtimeEffect.makeShader(
    uniforms = Data.makeFromBytes(timeBits),
    children = null,
    localMatrix = null,
    isOpaque = false
)
shaderPaint.setShader(shader)
Then we have our draw logic
val brush = ShaderBrush(shader)

Box(modifier = Modifier.fillMaxSize().drawBehind {
    drawRect(
        brush = brush, topLeft = Offset(100f, 65f), size = Size(400f, 400f)
    )
})
And finally, a Compose effect that syncs our updates with the clock and updates the time-based parameter:
LaunchedEffect(null) {
    while (true) {
        withFrameNanos { frameTimeNanos ->
            val nanosPassed = frameTimeNanos - previousNanos
            val delta = nanosPassed / 100000000f
            if (previousNanos > 0.0f) {
                timeUniform -= delta
            }
            previousNanos = frameTimeNanos
        }
    }
}
Now, on every clock frame we update the timeUniform variable, and then pass that newly updated value into the shader. Compose detects that a variable used in our top-level composable has changed, recomposes it and redraws the content – essentially asking our shader to redraw the relevant area based on the new value.
Stay tuned for more news on Aurora as it is getting closer to its first official release!
Notes:
- Multiple texture reads are expensive, and you might want to force such paths to draw the texture to an
SkSurface and read its pixels from an SkImage.
- If your shader does not need to create an exact, pixel-perfect replica of the target visuals, consider sacrificing some of the finer visual details for performance. For example, a large horizontal blur that reads 20 pixels on each “side” as part of the convolution (41 reads for every pixel) can be replaced by double or triple invocation of a smaller convolution matrix, or downscaling the original image, applying a smaller blur and upscaling the result.
- Performance is important as your shader (or shader chain) runs on every pixel. It can be a high-resolution display (lots of pixels to process), a low-end GPU, a CPU-bound pipeline (no GPU), or any combination thereof.