Shader based render effects in Compose Desktop with Skia
Earlier in the Compose Desktop / Skia explorations:
- Introduction to Skia shaders
- Using Skia shaders for more pleasant looking gradients
- Drawing text on a path in Compose Desktop with Skia
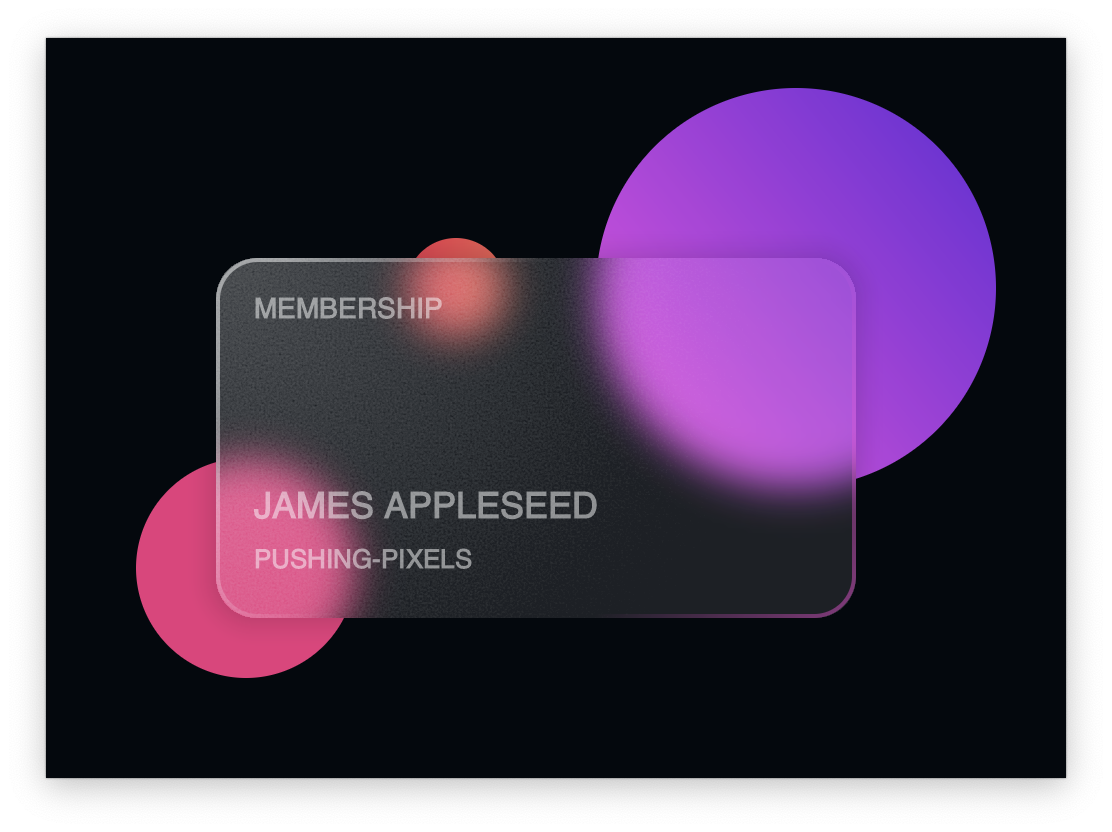
Today, we’re going to look at the recent addition in Skia – shader-based image filters, that are available as render effects in Compose Desktop. These filters operate on the content of the specific render node in the Compose hierarchy, allowing for effects like this to be implemented with a single composite shader (visuals are from this article):
Let’s start with a skeleton window. For the purposes of this demo, it is a simple undecorated Compose window. You can’t move it, you can’t resize it, you can’t click around, and it serves as the backdrop for our main content. First, the window visuals:

And the code behind it:
fun main() = application {
    val state = rememberWindowState(
        placement = WindowPlacement.Floating,
        position = WindowPosition.Aligned(Alignment.Center),
        size = DpSize(510.dp, 370.dp)
    )

    Window(
        title = "Compose / Skia shader demo",
        state = state,
        undecorated = true,
        onCloseRequest = ::exitApplication,
    ) {
        Box(modifier = Modifier.fillMaxSize(1.0f).background(Color(0xFF03080D))) {
        }
    }
}
Now we add our three circles. One is solid fill, and the other two use gradients, one horizontal and the other diagonal:
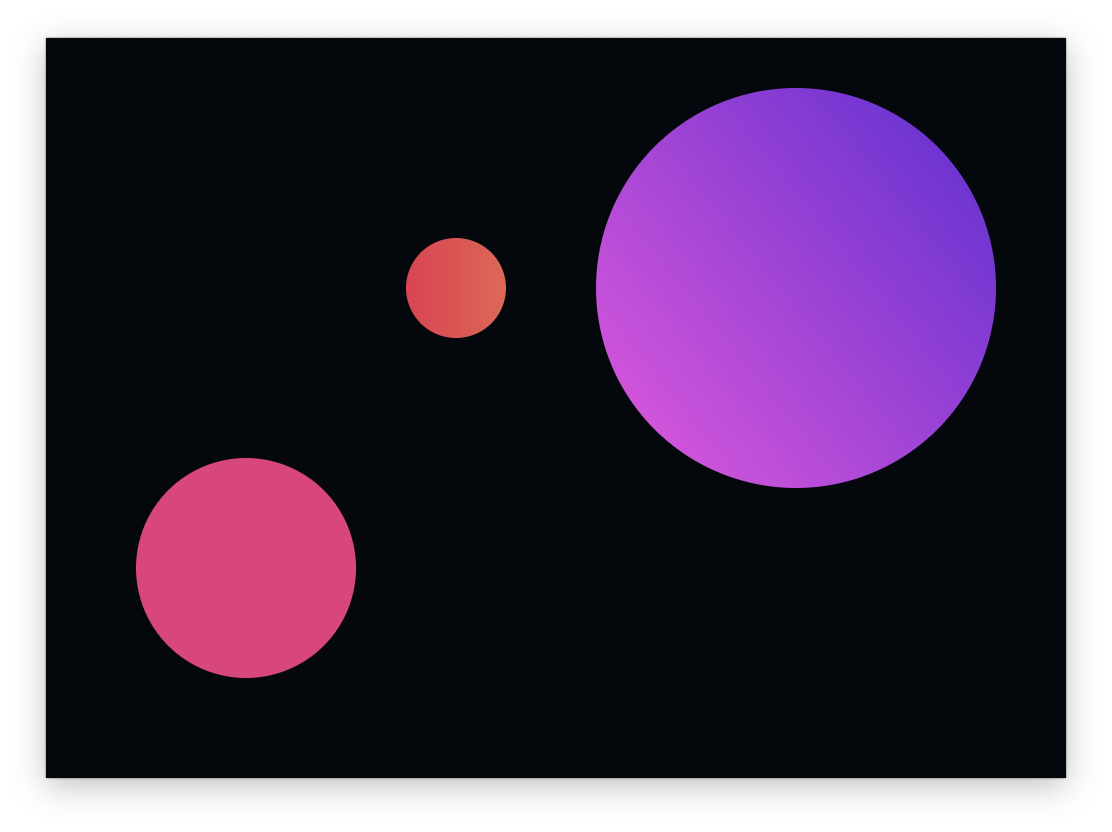
And the code, using Canvas.drawCircle and Brush.linearGradient APIs:
Canvas(modifier = Modifier.fillMaxSize(1.0f)) {
    drawCircle(
        brush = Brush.linearGradient(
            colors = listOf(Color(0xFF7A26D9), Color(0xFFE444E1)),
            start = Offset(450.dp.toPx(), 60.dp.toPx()),
            end = Offset(290.dp.toPx(), 190.dp.toPx()),
            tileMode = TileMode.Clamp
        ),
        center = Offset(375.dp.toPx(), 125.dp.toPx()),
        radius = 100.dp.toPx()
    )
    drawCircle(
        color = Color(0xFFEA357C),
        center = Offset(100.dp.toPx(), 265.dp.toPx()),
        radius = 55.dp.toPx()
    )
    drawCircle(
        brush = Brush.linearGradient(
            colors = listOf(Color(0xFFEA334C), Color(0xFFEC6051)),
            start = Offset(180.dp.toPx(), 125.dp.toPx()),
            end = Offset(230.dp.toPx(), 125.dp.toPx()),
            tileMode = TileMode.Clamp
        ),
        center = Offset(205.dp.toPx(), 125.dp.toPx()),
        radius = 25.dp.toPx()
    )
}
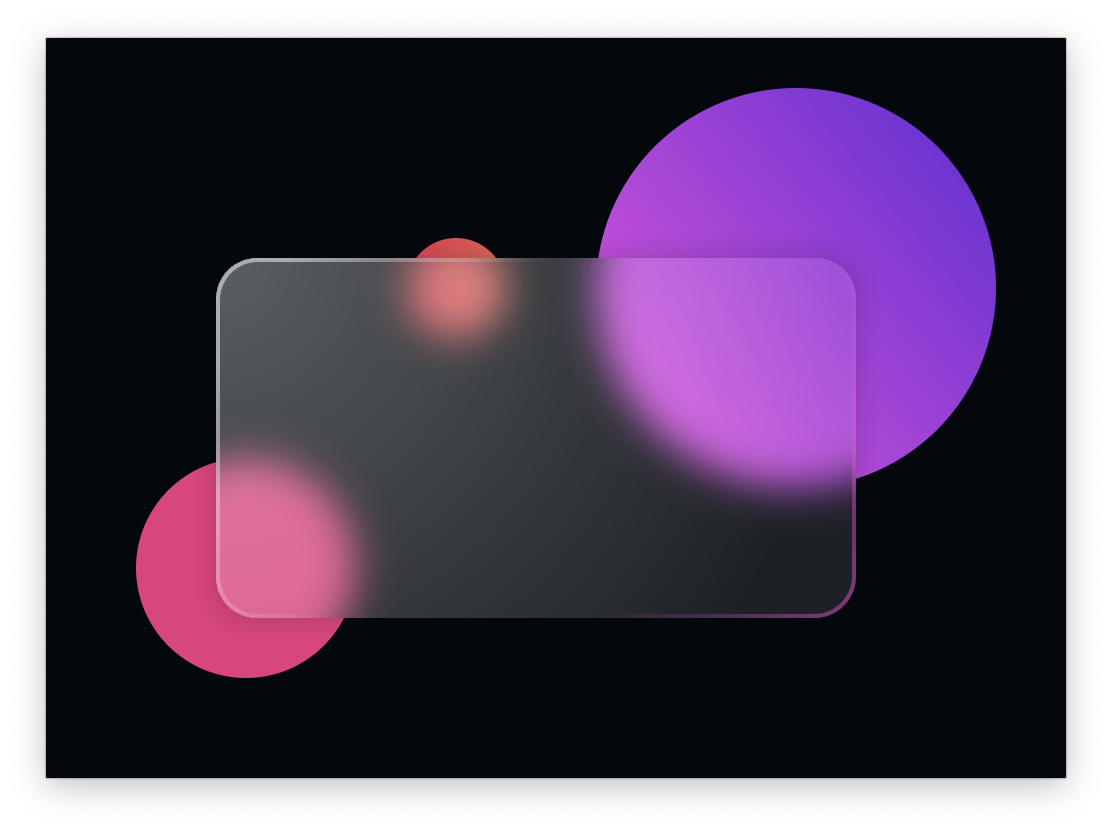
Now we start with the core of the implementation, our shader. The shader “runs” on every pixel in the render content of this Canvas node. For the pixels inside the rounded rectangle of the “card”, we want to apply a blur effect, and for the pixels outside of that rounded rectangle, we don’t want to apply anything (a tweak on this part in just a moment). In order to distinguish between the pixels inside and outside the card, we:
- Pass the rounded rectangle configuration – bounding box and corner radius – into the shader as uniforms (aka parameters).
- Use a helper 2D signed-distance function (SDF) to determine if the current pixel is inside or outside of our rounded rectangle.
First, the visuals we achieve:
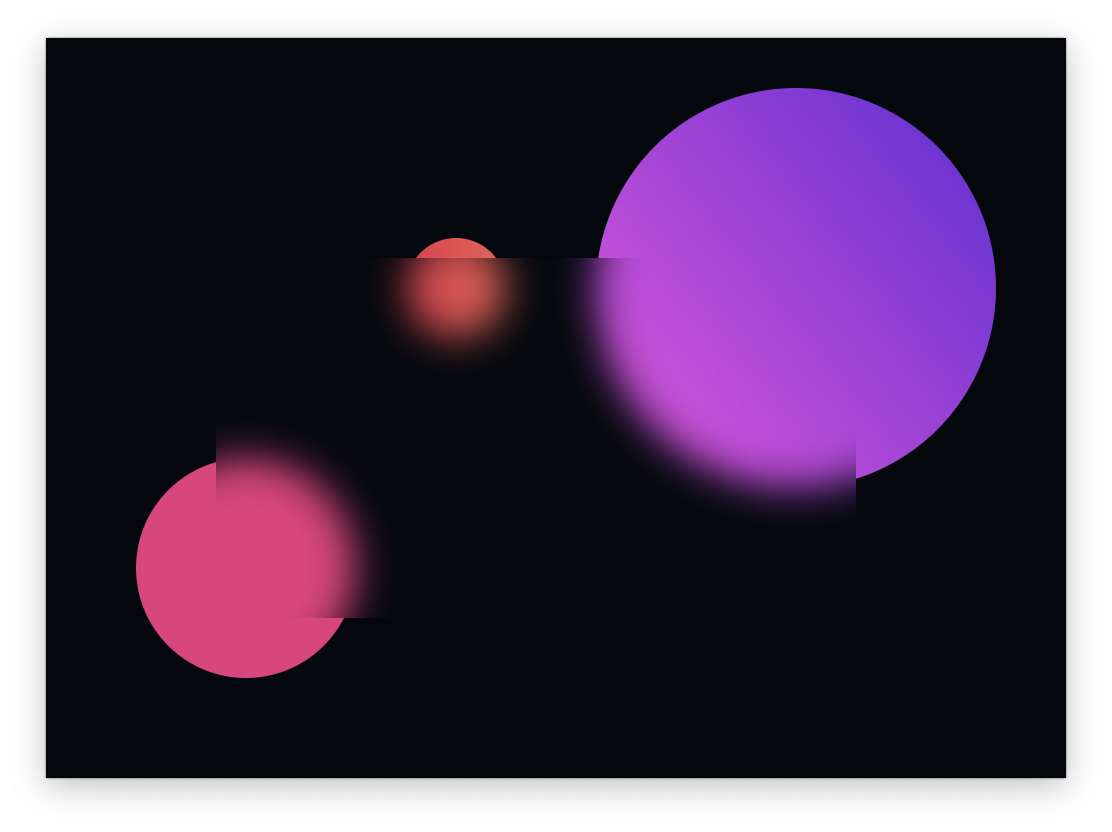
And the code:
// Recreate visuals from https://uxmisfit.com/2021/01/13/how-to-create-glassmorphic-card-ui-design/
val compositeSksl = """
    uniform shader content;
    uniform shader blur;

    uniform vec4 rectangle;
    uniform float radius;

    // Simplified version of SDF (signed distance function) for a rounded box
    // from https://www.iquilezles.org/www/articles/distfunctions2d/distfunctions2d.htm
    float roundedRectangleSDF(vec2 position, vec2 box, float radius) {
        vec2 q = abs(position) - box + vec2(radius);
        return min(max(q.x, q.y), 0.0) + length(max(q, 0.0)) - radius;
    }

    vec4 main(vec2 coord) {
        vec2 shiftRect = (rectangle.zw - rectangle.xy) / 2.0;
        vec2 shiftCoord = coord - rectangle.xy;
        float distanceToClosestEdge = roundedRectangleSDF(
            shiftCoord - shiftRect, shiftRect, radius);

        vec4 c = content.eval(coord);
        if (distanceToClosestEdge > 0.0) {
            // We're outside of the filtered area
            return c;
        }

        vec4 b = blur.eval(coord);
        return b;
    }
"""

val compositeRuntimeEffect = RuntimeEffect.makeForShader(compositeSksl)
val compositeShaderBuilder = RuntimeShaderBuilder(compositeRuntimeEffect)

val density = LocalDensity.current.density
compositeShaderBuilder.uniform(
     "rectangle",
     85.0f * density, 110.0f * density, 405.0f * density, 290.0f * density
)
compositeShaderBuilder.uniform("radius", 20.0f * density)

Canvas(
    modifier = Modifier.fillMaxSize(1.0f)
        .graphicsLayer(
            renderEffect = ImageFilter.makeRuntimeShader(
                runtimeShaderBuilder = compositeShaderBuilder,
                shaderNames = arrayOf("content", "blur"),
                inputs = arrayOf(
                    null, ImageFilter.makeBlur(
                        sigmaX = 20.0f,
                        sigmaY = 20.0f,
                        mode = FilterTileMode.DECAL
                    )
                )
            ).asComposeRenderEffect(),
        )
) {
... the circle drawing commands as before
}
Let’s take a closer look at the various parts:
- The code for the shader itself is a single, multiline string. That string gets compiled by Skia at runtime, and for now there is no built-in syntax highlight or error checking at editing or build time inside IDEA. To get this going, install this plugin and mark your shader string as
@Language("GLSL"). - The shader gets two parameters. The first one is the “implicitly” available
content– which is the content of the underlying render node, which is in our case theCanvaswith three circles. The second is ourblurshader that will be applied on pixels inside the rounded rectangle area. - The rounded rectangle configuration is passed as two uniforms. The first one is the bounding box as
vec4(a 4-tuple offloats). The second one is the corner radius as afloat. - We create a runtime effect with
RuntimeEffect.makeForShader - Which we then wrap in a
RuntimeShaderBuilder - Which is then used to create a render effect to be set on
Modifier.graphicsLayeron ourCanvasnode:- Passing
contentandbluras child shader names – note that these need to match theuniform shaders in the shader itself nullfor thecontentinput – signalling to Skia that the actual input will be the content of the underlying render node- And
ImageFilter.createBluras theblurinput – a blur image filter to be applied on pixels inside the rounded rectangle
- Passing
- Finally, note that the result of
ImageFilter.makeRuntimeShaderwhich is a Skia API object needs to be converted to a Compose API object withImageFilter.asComposeRenderEffectAPI.
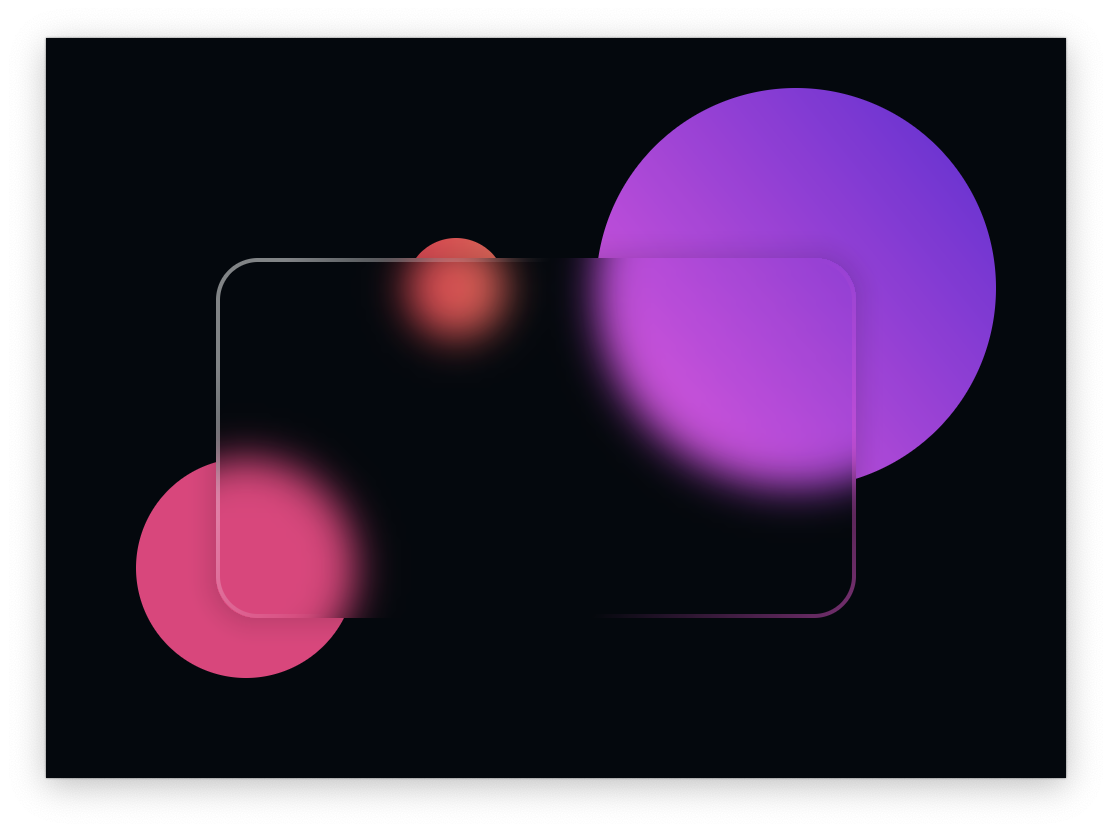
At this point, it is a bit hard to see if the blur is applied only on pixels inside the rounded rectangle, as all those rounded corners are effectively “invisible” as far as the blur is concerned (blurring a solid black rectangle leaves all the pixels the same black color). What we’re going to do now is to add another canvas child to our top-level box, which will be the card border (plus the texts as the very last step):

Canvas(modifier = Modifier.fillMaxSize(1.0f)) {
    drawRoundRect(
        brush = Brush.linearGradient(
            colors = listOf(Color(0x80FFFFFF), Color(0x00FFFFFF), Color(0x00FF48DB), Color(0x80FF48DB)),
            start = Offset(120.dp.toPx(), 110.dp.toPx()),
            end = Offset(405.dp.toPx(), 290.dp.toPx()),
            tileMode = TileMode.Clamp
        ),
        topLeft = Offset(86.dp.toPx(), 111.dp.toPx()),
        size = Size(318.dp.toPx(), 178.dp.toPx()),
        cornerRadius = CornerRadius(20.dp.toPx()),
        style = Stroke(width = 2.dp.toPx()),
    )
}
Note that we still can’t see if the blur is applied properly around the rounded corners. To see that, we would need to apply “sharper” color gradients on our circles, and a gradient on our top-level box itself. However, for the purpose of this particular demo, that step is not strictly necessary, and we’re going to skip it.
Our next step is going back to our rounded rectangle and applying a drop shadow around it to help offset it a bit from the background with the circles, creating a slight visual separation between these two conceptual layers:
From the implementation perspective, my first try was to look at ImageFilter.makeDropShadow and ImageFilter.makeDropShadowOnly Skia APIs, but it would appear that:
- The first one operates as “expected” (at least from what I expected) only on fully-opaque filled shapes. In our case, our “card” is a translucent white gradient, so the drop shadow is much less noticed since the fill itself is not fully opaque. And in addition, the drop shadow is applied as a “ghost” of the shape outline, not only outside of the shape, but also inside it. For a fully-opaque fill it doesn’t matter, as that inside drop shadow is effectively hidden. But for a translucent fill it is quite noticeable.
- This second part (outer and inner parts of the drop shadow) is why the second API is not a good fit as well.
While these issue might be addressed by applying a negative clip (clipping out the inner part of the rounded rectangle), or using one of the blend modes perhaps, here I’m opting for emulating the drop shadow as part of the shader itself:
vec4 c = content.eval(coord);
if (distanceToClosestEdge > 0.0) {
    // We're outside of the filtered area
    if (distanceToClosestEdge < dropShadowSize) {
        // Emulate drop shadow around the filtered area
        float darkenFactor = (dropShadowSize - distanceToClosestEdge) / dropShadowSize;
        // Use exponential drop shadow decay for more pleasant visuals
        darkenFactor = pow(darkenFactor, 1.6);
        // Shift towards black, by 10% around the edge, dissipating to 0% further away
        return c * (0.9 + (1.0 - darkenFactor) / 10.0);
    }
    return c;
}
The signed-distance function returns a float – negative if the point is inside the shape, and positive if it’s outside. What we do here is we look at the positive case – pixels outside of the shape, and for those within the a certain distance of the rounded rectangle outline, we apply a decayed darkening, effectively shifting the color of the current pixel given to us from the content.eval(coord) call towards the black color. The decay itself is exponential to better emulate the drop shadow appearance – see the pow(darkenFactor, 1.6) call.
This part, by the way, is why the shader is applied on the entire canvas node with no clipping. While the blur (and subsequent inner fill + noise) is applied to the inside of the rounded rectangle, the drop shadow effect is applied to pixels outside of that area.
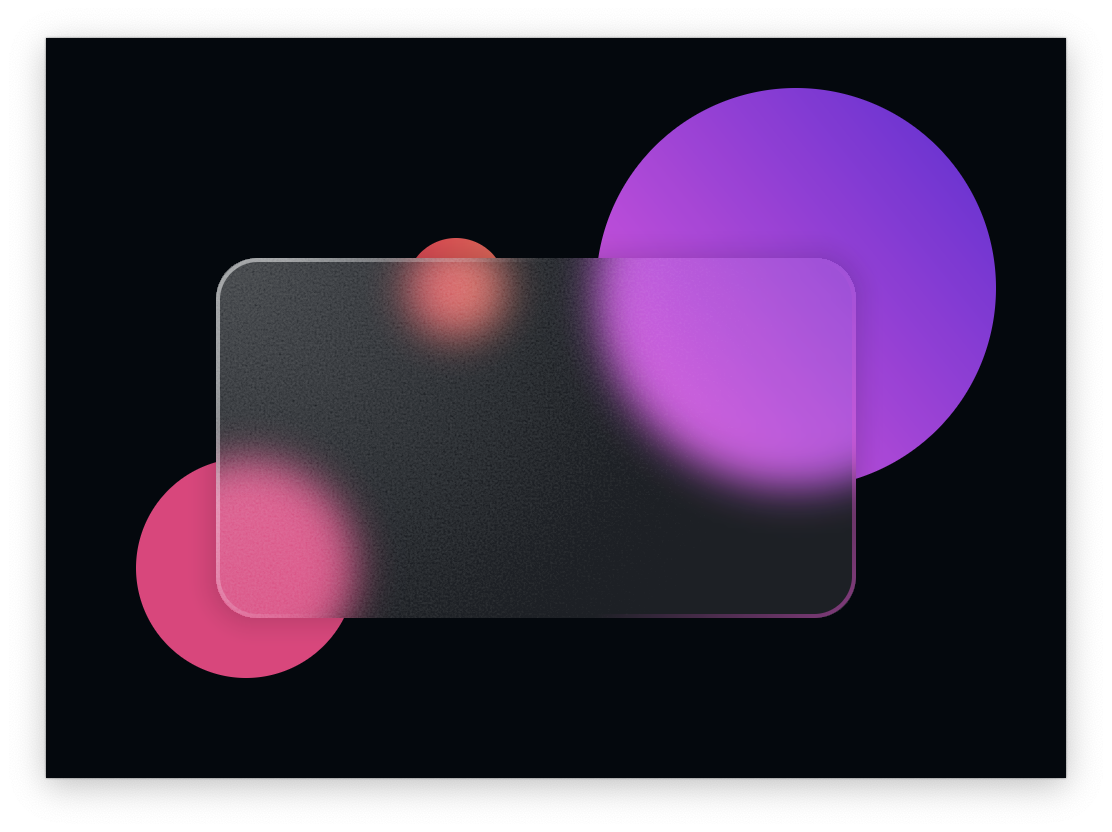
Now we do a translucent gradient white inner fill:
The fill is the strongest around the top-left corner of our inner area, and decays towards the bottom-right corner. First, we determine how far away our pixel is from that top-left corner using the built-in length function and the built-in xyzw swizzles, and then shift the color of the blurred pixel obtained from the blur.eval(coord) call towards white color – which is vec4(1.0) in this shader snippet:
vec4 b = blur.eval(coord);
// How far are we from the top-left corner?
float lightenFactor = min(1.0, length(coord - rectangle.xy) / (0.85 * length(rectangle.zw - rectangle.xy)));
// Shift towards white, by 35% in top left corner, down to 10% in bottom right corner
return b + (vec4(1.0) - b) * (0.35 - 0.25 * lightenFactor);
If you look closely enough, you will see a noticeable banding of this radial gradient. To address this visual imperfection, we also apply a noise texture on top of the translucent gradient white fill:
First, we need to configure the source of the noise itself. For that, we add one more uniform shader to our shader:
uniform shader noise;
And use Shader.makeFractalNoise and RuntimeShaderBuilder.child to pass that noise shader in:
compositeShaderBuilder.child(
    "noise", Shader.makeFractalNoise(
        baseFrequencyX = 0.45f,
        baseFrequencyY = 0.45f,
        numOctaves = 4,
        seed = 2.0f
    )
)
With this last addition to our main shader, we can incorporate the noise on top of our translucent white gradient:
vec4 b = blur.eval(coord);
vec4 n = noise.eval(coord);
// How far are we from the top-left corner?
float lightenFactor = min(1.0, length(coord - rectangle.xy) / (0.85 * length(rectangle.zw - rectangle.xy)));
// Add some noise for extra texture
float noiseLuminance = dot(n.rgb, vec3(0.2126, 0.7152, 0.0722));
// Shift towards white, by 35% in top left corner, down to 10% in bottom right corner
lightenFactor = min(1.0, lightenFactor + noiseLuminance);
return b + (vec4(1.0) - b) * (0.35 - 0.25 * lightenFactor);
Note that the output of Shader.makeFractalNoise for each pixel is not greyscale, and we use the rgb swizzle mask to convert the red-green-blue components of the noise pixel to its luminance value, and then apply that luminance on top of the gradient fill alpha.
Finally, we are ready to add our three texts on the inside of the rounded rectangle that now combines blur, translucent white gradient and noise texture:
While not strictly necessary in this particular case, here I’m using the previously introduced helper function Canvas.drawTextOnPath that draws a string along the specified path – in our case, each path is a simple horizontal segment:
drawTextOnPath(
    text = "MEMBERSHIP",
    textSize = 14.dp,
    isEmboldened = true,
    path = Path().also { path ->
        path.moveTo(100.dp.toPx(), 140.dp.toPx())
        path.lineTo(400.dp.toPx(), 140.dp.toPx())
    },
    offset = Offset(2.dp.toPx(), 0.0f),
    textAlign = TextAlign.Left,
    paint = Paint().also {
        it.color = Color(0x80FFFFFF)
        it.style = PaintingStyle.Fill
    },
)

drawTextOnPath(
    text = "JAMES APPLESEED",
    textSize = 18.dp,
    isEmboldened = true,
    path = Path().also { path ->
        path.moveTo(100.dp.toPx(), 240.dp.toPx())
        path.lineTo(400.dp.toPx(), 240.dp.toPx())
    },
    offset = Offset(2.dp.toPx(), 0.0f),
    textAlign = TextAlign.Left,
    paint = Paint().also {
        it.color = Color(0x80FFFFFF)
        it.style = PaintingStyle.Fill
    },
)

drawTextOnPath(
    text = "PUSHING-PIXELS",
    textSize = 13.dp,
    isEmboldened = true,
    path = Path().also { path ->
        path.moveTo(100.dp.toPx(), 265.dp.toPx())
        path.lineTo(400.dp.toPx(), 265.dp.toPx())
    },
    offset = Offset(2.dp.toPx(), 0.0f),
    textAlign = TextAlign.Left,
    paint = Paint().also {
        it.color = Color(0x80FFFFFF)
        it.style = PaintingStyle.Fill
    },
)
A couple more notes before I wrap this up.
There are almost always multiple ways to use existing graphics APIs to achieve the target visuals. I’m using a single composite shader with two child shaders (blur and noise) to highlight the capabilities of existing Skia shader APIs. I also decided to skip exploring the drop shadow image filter APIs and emulate that part in this shader. All of these can be broken apart to multiple shaders, multiple canvases or to use different Skia APIs.
The reason to use two Canvas composables is to separate:
- the “background” of the card – the blur, the translucent white gradient, the noise – which is applied to the underlying colored circles
- from the “foreground” of the card – the translucent border and the texts – which are drawn on top of that composite background
The full code of this demo is available in the Artemis repository.
This is it for this installment. Stay tuned for more explorations of Skia in Compose Desktop as the year progresses.
